Renarde  Web Framework - Advanced
Forms
A lot of the time, you need to send data from the browser to your endpoints, which is often done with forms.
The HTML form
Creating forms in Renarde is easy: let’s see an example of how to do it in Qute:
{#form uri:Login.complete(newUser.confirmationCode)}

<fieldset>
    <legend>Complete registration for {newUser.email}</legend>
    {#formElement name="userName" label="User Name"}
        {#input name="userName"/}
    {/formElement}
    {#formElement name="password" label="Password"}
        {#input name="password" type="password"/}
    {/formElement}
    {#formElement name="password2" label="Password Confirmation"}
        {#input name="password2" type="password"/}
    {/formElement}
    {#formElement name="firstName" label="First Name"}
        {#input name="firstName"/}
    {/formElement}
    {#formElement name="lastName" label="Last Name"}
        {#input name="lastName"/}
    {/formElement}
    <button type="submit" class="btn btn-primary">Complete registration</button>
</fieldset>

{/form}
Here we’re defining a form whose action will go to Register.complete(newUser.confirmationCode) and
which contains several form elements, which are just tags to make composition easier. For example formElement is
a custom Qute tag for Bootstrap which defines layout for the form element and displays any associated error:
<div class="mb-3">
<label class="form-label" for="{name}">{label}</label>
{nested-content}
{#ifError name}
<span class="invalid-feedback">{#error name/}</span>
{/ifError}
</div>The input user tag is also designed for Bootstrap as an abstraction:
<input name="{name}"
 type="{type ?: 'text'}"
 placeholder="{placeholder ?: ''}"
 class="form-control {#ifError name}is-invalid{/ifError}"
 maxlength="{global:VARCHAR_SIZE}"
 value="{inject:flash.get(name)}"/>
As you can see, we have default values for certain attributes, a special error class if there is a validation error, and we default the value to the one preserved in the flash scope, which is filled whenever validation fails, so that the user can see the validation error without losing their form values.
As for the form Renarde tag, it is also fairly simple, and only includes an authenticity token for CSRF protection.
<form action="{it}" method="{method ?: 'POST'}" class="{klass ?: ''}">
 {#authenticityToken/}
 {nested-content}
</form>
The endpoint
Most forms will be a @POST endpoint, with each form element having a corresponding parameter annotated with @RestForm.
@POST
public void complete(@RestQuery String confirmationCode,
        @RestForm String userName,
        @RestForm String password,
        @RestForm String password2,
        @RestForm String firstName,
        @RestForm String lastName) {
    // do something with the form parameters
}
You can also group parameters in a POJO, but for now you have to add a special
@Consumes(MediaType.MULTIPART_FORM_DATA) annotation:
@Consumes(MediaType.MULTIPART_FORM_DATA)
@POST
public void complete(@RestQuery String confirmationCode,
        FormData form) {
    // do something with the form parameters
}

public static class FormData {
    @RestForm String userName;
    @RestForm String password;
    @RestForm String password2;
    @RestForm String firstName;
    @RestForm String lastName;
}
Check out the RESTEasy Reactive documentation for more information about form parameters and multi-part.
Validation
You can place your usual Hibernate Validation annotations on the controller methods that receive user data, but keep in mind that you have to check for validation errors in your method before you do any action that modifies your state. This allows you to check more things than you can do with just annotations, with richer logic:
@POST
public Response complete(@RestQuery String confirmationCode,
        @RestForm @NotBlank @Length(max = Util.VARCHAR_SIZE) String userName,
        @RestForm @NotBlank @Length(min = 8, max = Util.VARCHAR_SIZE) String password,
        @RestForm @NotBlank @Length(max = Util.VARCHAR_SIZE) String password2,
        @RestForm @NotBlank @Length(max = Util.VARCHAR_SIZE) String firstName,
        @RestForm @NotBlank @Length(max = Util.VARCHAR_SIZE) String lastName) {
    // Find the user for this confirmation code
    User user = User.findForContirmation(confirmationCode);
    if(user == null){
        validation.addError("confirmationCode", "Invalid confirmation code");
    }

    // Make sure the passwords match
    validation.equals("password", password, password2);

    // Make sure the username is free
    if(User.findByUserName(userName) != null){
        validation.addError("userName", "User name already taken");
    }

    // If validation failed, redirect to the confirm page
    if(validationFailed()){
        confirm(confirmationCode);
    }

    // Now proceed to complete user registration
    ...
}
You can use the validation object to trigger additional validation logic and collect errors.
Those errors are then placed in the flash scope by a call to validationFailed() if there
are any errors, and thus preserved when you redirect from your action method to the @GET method
that holds the submitted form, which you can then access in your views using the {#ifError field}{/ifError}
conditional tag, or the {#error field/} tag which accesses the error message for the given field.
Routing, URI mapping, redirects
We have seen how to declare endpoints and how URIs map to them, but very often we need to map from endpoints to URIs, which Renarde makes easy.
Redirects after POST
When handling a @POST, @PUT or @DELETE endpoint, it’s good form to redirect to a @GET endpoint after
the action has been done, in order to allow the user to reload the page without triggering the action a second
time, and such redirects are simply done by calling the corresponding @GET endpoint. In reality, the endpoint
will not be called and will be replaced by a redirect that points to the endpoint in question.
package rest;

import jakarta.ws.rs.POST;
import jakarta.ws.rs.Path;

import io.quarkus.qute.CheckedTemplate;
import io.quarkus.qute.TemplateInstance;
import io.quarkiverse.renarde.Controller;

public class Application extends Controller {

    @CheckedTemplate
    static class Templates {
        public static native TemplateInstance index();
    }

    @Path("/")
    public TemplateInstance index() {
        return Templates.index();
    }

    @POST
    public void someAction() {
        // do something
        ...
        // redirect to the index page
        index();
    }
}
If there are any parameters that form the URI, you must pass them along:
package rest;

import jakarta.ws.rs.POST;
import jakarta.ws.rs.Path;

import org.jboss.resteasy.reactive.RestPath;
import org.jboss.resteasy.reactive.RestQuery;

import io.quarkus.qute.CheckedTemplate;
import io.quarkus.qute.TemplateInstance;
import io.quarkiverse.renarde.Controller;

public class Application extends Controller {

    @CheckedTemplate
    static class Templates {
        public static native TemplateInstance index();
    }

    @Path("/")
    public TemplateInstance index() {
        return Templates.index();
    }

    public TemplateInstance somePage(@RestPath String id, @RestQuery String q) {
        // do something with the id and q
        return Templates.index();
    }

    @POST
    public void someAction() {
        // do something
        ...
        // redirect to the somePage page
        somePage("foo", "bar");
    }
}
If you want to redirect to another controller, you can use the redirect(Class) method:
package rest;

import jakarta.ws.rs.POST;

import io.quarkiverse.renarde.Controller;

public class Application extends Controller {

    @POST
    public void someAction() {
        // do something
        ...
        // redirect to the Todos.index() endpoint
        redirect(Todos.class).index();
    }
}
Obtaining a URI in endpoints
If you don’t want a redirect but need a URI to a given endpoint, you can use the Router.getURI
or Router.getAbsoluteURI methods, by
passing them a method reference to the endpoint you want and the required parameters:
package rest;

import java.net.URI;

import org.jboss.resteasy.reactive.RestPath;
import org.jboss.resteasy.reactive.RestQuery;

import io.quarkus.qute.CheckedTemplate;
import io.quarkus.qute.TemplateInstance;
import io.quarkiverse.renarde.Controller;
import io.quarkiverse.renarde.router.Router;

public class Application extends Controller {

    @CheckedTemplate
    public static class Templates {
        public static native TemplateInstance somePage();
        public static native TemplateInstance otherPage(URI uri);
    }

    public TemplateInstance somePage(@RestPath String foo, @RestQuery Long bar) {
        return Templates.somePage();
    }

    public TemplateInstance otherPage() {
        // Obtain a URI to somePage
        URI uri = Router.getURI(Login::somePage, "something", 23l);
        // pass it on to our view
        return Templates.otherPage(uri);
    }
}
If you plan on using Response.seeOther or Controller.seeOther, make sure to use the Router.getAbsoluteURI
variant, especially if you use the quarkus.http.root-path configuration, otherwise your URIs contain that prefix twice.
|
Emails
<dependency>
  <groupId>io.quarkus</groupId>
  <artifactId>quarkus-mailer</artifactId>
</dependency>
Often you will need your actions to send email notifications.You can use Qute for this too, by declaring your
emails in an Emails class:
package email;

import io.quarkus.mailer.MailTemplate.MailTemplateInstance;
import io.quarkus.qute.CheckedTemplate;
import model.User;

public class Emails {

    private static final String FROM = "Todos <todos@example.com>";
    private static final String SUBJECT_PREFIX = "[Todos] ";

    @CheckedTemplate
    static class Templates {
        public static native MailTemplateInstance confirm(User user);
    }

    public static void confirm(User user) {
        Templates.confirm(user)
        .subject(SUBJECT_PREFIX + "Please confirm your email address")
        .to(user.email)
        .from(FROM)
        .send().await().indefinitely();
    }
}
You can then send the email from your endpoint by calling Emails.confirm(user).
You can use composition for emails too, by having a pair of base templates for HTML in
src/main/resources/templates/email.html:
<!DOCTYPE html>

<html>
    <head>
        <meta charset="UTF-8">
    </head>
    <body>
        {#insert /}
        <p>
            This is an automated email, you should not reply to it: your mail will be ignored.
        </p>
    </body>
</html>
And for text in src/main/resources/templates/email.txt:
{#insert /}

This is an automated email, you should not reply to it: your mail will be ignored.
You can then use those templates in your emails in src/main/resources/templates/Emails/confirm.html:
{#include email.html }

<p>
 Welcome to Todos.
</p>

<p>
 You received this email because someone (hopefully you) wants to register on Todos.
</p>

<p>
 If you don't want to register, you can safely ignore this email.
</p>

<p>
 If you want to register, <a href="{uriabs:Login.confirm(user.confirmationCode)}">complete your registration</a>.
</p>
{/include}
And for text in src/main/resources/templates/Emails/confirm.txt:
{#include email.txt}

Welcome to Todos.

You received this email because someone (hopefully you) wants to register on Todos.

If you don't want to register, you can safely ignore this email.

If you want to register, complete your registration by going to the following address:

{uriabs:Login.confirm(user.confirmationCode)}
{/include}
Note that in emails you will want to use the uriabs namespace for absolute URIs and not relative ones,
otherwise the links won’t work for your email recipients.
You can find more information in the Quarkus mailer documentation.
Localisation / Internationalisation
You can declare your default language and supported languages in src/main/resources/application.properties:
# This is the default locale for your application
quarkus.default-locale=en
# These are the supported locales (should include the default locale, but order is not important)
quarkus.locales=en,fr
Next, you can declare your default language messages in the src/main/resources/messages.properties file:
# A simple message
hello=Hello World
# A parameterised message for your view
views_Application_index_greet=Hello %s
Declare your other language translations in the src/main/resources/messages_fr.properties file:
hello=Bonjour Monde
views_Application_index_greet=Salut %s
Now you can use these translated messages in your controller:
public static class Application extends Controller {

    @CheckedTemplate
    public static class Templates {
        public static native TemplateInstance index(String name);
    }

    public TemplateInstance index() {
        return Templates.index("Stef");
    }

    public String hello() {
		return i18n.formatMessage("hello");
    }
}
Or in your template:
With no parameter:
{m:hello}
With parameters:
{m:views_Application_index_greet(name)}
Selecting the language
The current language for a request will depend on the following (in order):
-
The
_renarde_localecookie, if set -
The
Accept-LanguageHTTP header, if set, which defines an ordered list of languages by user preference. We will select a best matching language from the set ofquarkus.locales. -
If nothing else, we default to the default language as set by
quarkus.default-locale, which defaults toen_US.
You can override the user’s language with a cookie by calling i18n.set(locale):
public static class Application extends Controller {

    @CheckedTemplate
    public static class Templates {
        public static native TemplateInstance index();
    }

    public void index() {
        return Templates.index();
    }

    @POST
    public void french() {
        i18n.set("fr");
        index();
    }

    @POST
    public void english() {
        i18n.set("en");
        index();
    }
}
Flash scope
If you need to pass values from one endpoint to another request after a redirect, you can use the Flash scope.
Usually this is done in a @POST endpoint, by filling the Flash scope with either errors or messages,
before trigerring a redirect to the right @GET endpoint.
You can push values in the Flash scope in an endpoint using the flash(name, value) method, or using the
Flash injectable component.
You can read values from the Flash scope in your Qute views using the {flash:name} namespace.
The Flash scope only lasts from one request to the next and is cleared at each request.
htmx
If you want to use htmx with Renarde, we added an extra layer to make things more convenient:
public class Application extends HxController {

    @CheckedTemplate
    public static class Templates {
        public static native TemplateInstance foo(int a, int b);
        public static native TemplateInstance foo$sectionA(int a); (1)
        public static native TemplateInstance foo$sectionB(int b); (1)

        public static native TemplateInstance bar();
    }

    public TemplateInstance foo() {
        if (isHxRequest()) { (2)
            return  concatTemplates( (3)
                    Templates.foo$sectionA(1),
                    Templates.foo$sectionB(2)
            );
        }
        return Templates.foo(1, 2);
    }

    public TemplateInstance bar() {
        onlyHxRequest(); (4)
        this.hx(HxResponseHeader.TRIGGER, "refresh"); (5)
        return Templates.bar();
    }
}| 1 | Qute fragments declarations |
| 2 | Check if this is a htmx request by looking for the HX-Request header or using flash data for redirects |
| 3 | Out of band swap with different templates or fragments |
| 4 | Only Hx requests are allowed, else it will fail with a BAD_REQUEST error |
| 5 | Flag the response with an htmx response header |
For CSRF Security, you need a form parameter with the CSRF Token. By adding this 👇 when doing a hx-post/put/delete, The Hx requests will be sent with the CSRF parameter:
<div hx-post"/hello" hx-vals='{"{inject:csrf.parameterName}": "{inject:csrf.token}"}'>Alternatively, you can use hx-headers on the <body> to make all hx requests secured with CSRF by adding a custom header:
<body hx-headers='{"{inject:csrf.headerName}":"{inject:csrf.token}"}'>
</body>
Some example projects with Quarkus Renarde and htmx: - a demo note-taking web app - a board game
Generating barcodes
If you import the optional quarkus-renarde-barcode module, you can generate barcodes in your views or controllers.
<dependency>
  <groupId>io.quarkiverse.renarde</groupId>
  <artifactId>quarkus-renarde-barcode</artifactId>
  <version>3.0.12</version>
</dependency>
We support the following barcode types, with custom Qute tags:
| Tag | Description |
|---|---|
|
Generate an EAN 13 barcode. |
|
Generate an EAN 8 barcode. |
|
Generate an UPC A barcode. |
|
Generate an UPC E barcode. |
|
Generate a Code 39 barcode. |
|
Generate a Code 93 barcode. |
|
Generate a Code 128 barcode. |
|
Generate a QR Code barcode. |
|
Generate a Data Matrix barcode. |
All these tags accept an optional size parameter that sets both the width and height of the barcode
in pixels, or width and height parameters to specify different values.These values all default
to 200 pixels.
The generated barcodes will be inline HTML images using the Data URI scheme as an embedded PNG image.
If you wish to generate barcode images as PNG bytes or other formats, you can use the io.quarkiverse.renarde.barcode.Barcode
helper class which allows you to generate bytecodes from your controllers.
Generating PDF documents
If you import the optional quarkus-renarde-pdf module, you can generate PDF documents in your views.
<dependency>
  <groupId>io.quarkiverse.renarde</groupId>
  <artifactId>quarkus-renarde-pdf</artifactId>
  <version>3.0.12</version>
</dependency>
There are lots of complicated ways to generate PDFs, but the simplest is to use the versatility of HTML for rendering
and its printing support. So, very much like you can print HTML files using your browser, and there are special rendering
rules in CSS, you do the same in Renarde PDF: you render your page in HTML, and simply add @Produces(Pdf.APPLICATION_PDF)
to your controller to produce a PDF file:
public class Application extends Controller {

    @CheckedTemplate
    public static class Templates {
        public static native TemplateInstance page();
    }

    // This will return a PDF file to the caller
    @Produces(Pdf.APPLICATION_PDF)
    public TemplateInstance pdf() {
        return Templates.page();
    }

    // This will return HTML to the caller
    public TemplateInstance html() {
        return Templates.page();
    }
}
This way, the http://localhost:8080/Application/pdf and http://localhost:8080/Application/html pages will render the same document in either PDF or HTML, which allows you to use your browser and its developer tools to fine-tweak your document, until you’re ready to turn it into a PDF, which is much harder to fine-tweak.
As for the templates/Application/page.html template, it’s regular HTML, but you can also
take advantage of the CSS print support
to set things like document page size, odd/even page margins, etc…:
<!DOCTYPE html>
<html>
  <head>
    <title>This is the PDF document title</title>
    <style>
/* Override page size, and set page margin */
@page {
  size: 15cm 9cm;
  margin: 1cm;
}
    </style>
  </head>
  <body>
    Some PDF text.
  </body>
</html>
Note that the default page size is A4.
Backoffice
| This is an experimental API and feature, subject to change. |
Renarde can automatically generate a UI for editing your entities. This can be useful to expose access to your entities to authenticated users who are trained enough to understand how to navigate your model.
You must import the optional quarkus-renarde-backoffice module.
<dependency>
  <groupId>io.quarkiverse.renarde</groupId>
  <artifactId>quarkus-renarde-backoffice</artifactId>
  <version>3.0.12</version>
</dependency>
Now, you can opt-in to specify which of your entities will be exposed via the generated backoffice by
implementing the BackofficeController<X> type for each entity type X to expose:
package rest;

import io.quarkiverse.renarde.backoffice.BackofficeController;
import io.quarkus.security.Authenticated;
import model.User;

@Authenticated
public class Users extends BackofficeController<User> {

}| This allows you to place authentication restrictions to your entities, but any other annotation works too. |
| Make sure to secure your backoffice, otherwise everyone will have access to your database! |
In order to also secure the backoffice index page, you may extend the BackofficeIndexController:
package rest;

import io.quarkiverse.renarde.backoffice.BackofficeIndexController;
import io.quarkus.security.Authenticated;

@Authenticated
public class Backoffice extends BackofficeIndexController {

}
This is all you have to do!
Now you can sit back, relax and head over to http://localhost:8080/_renarde/backoffice/index and see the list of entity types you have enlisted in the backoffice:
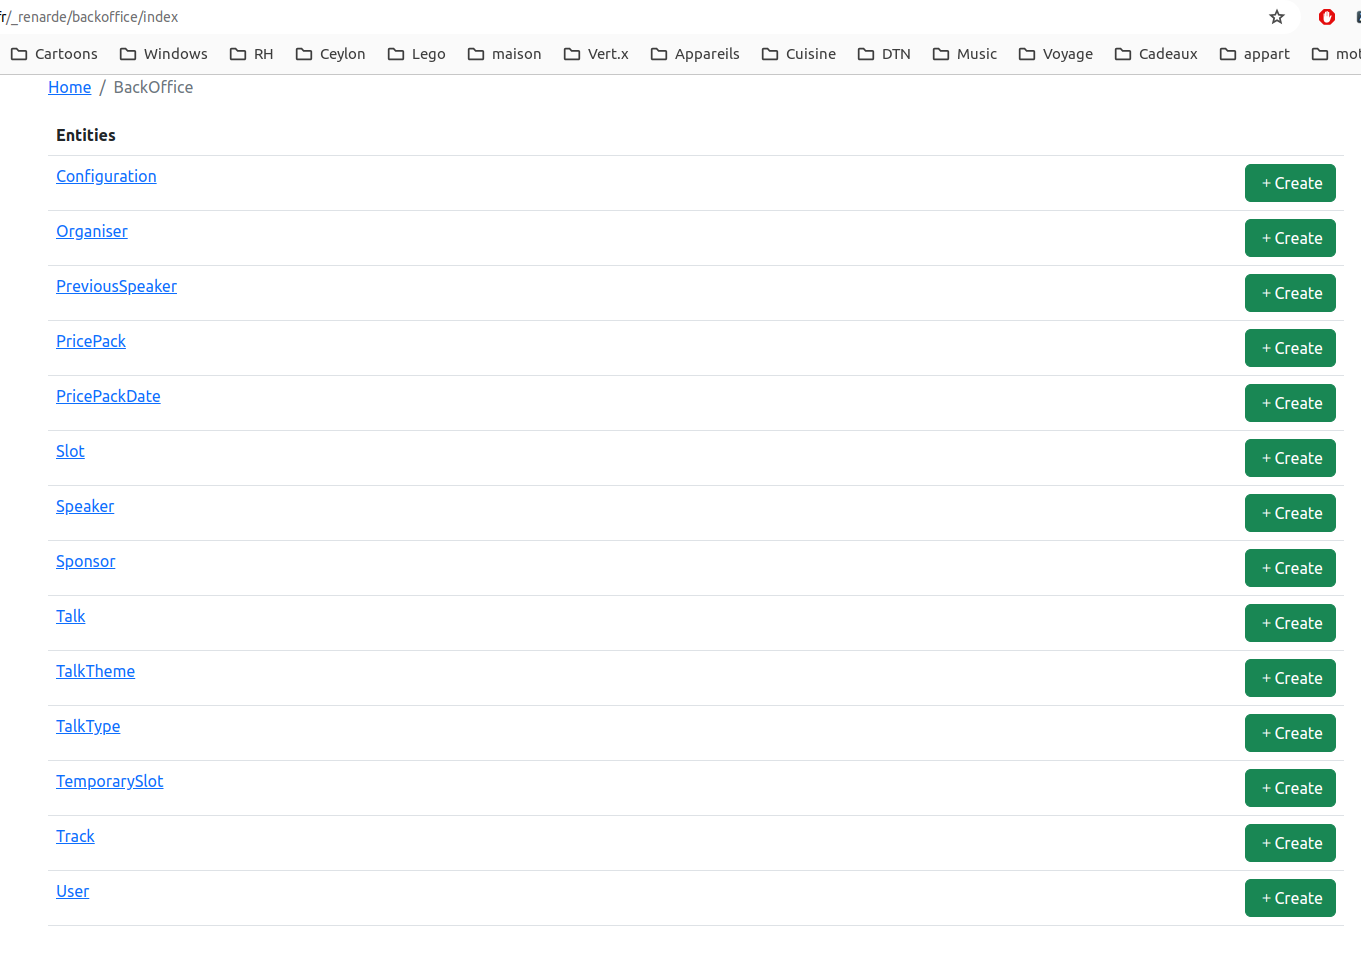
If you select an entity type, you are presented with the list of entities of this type:
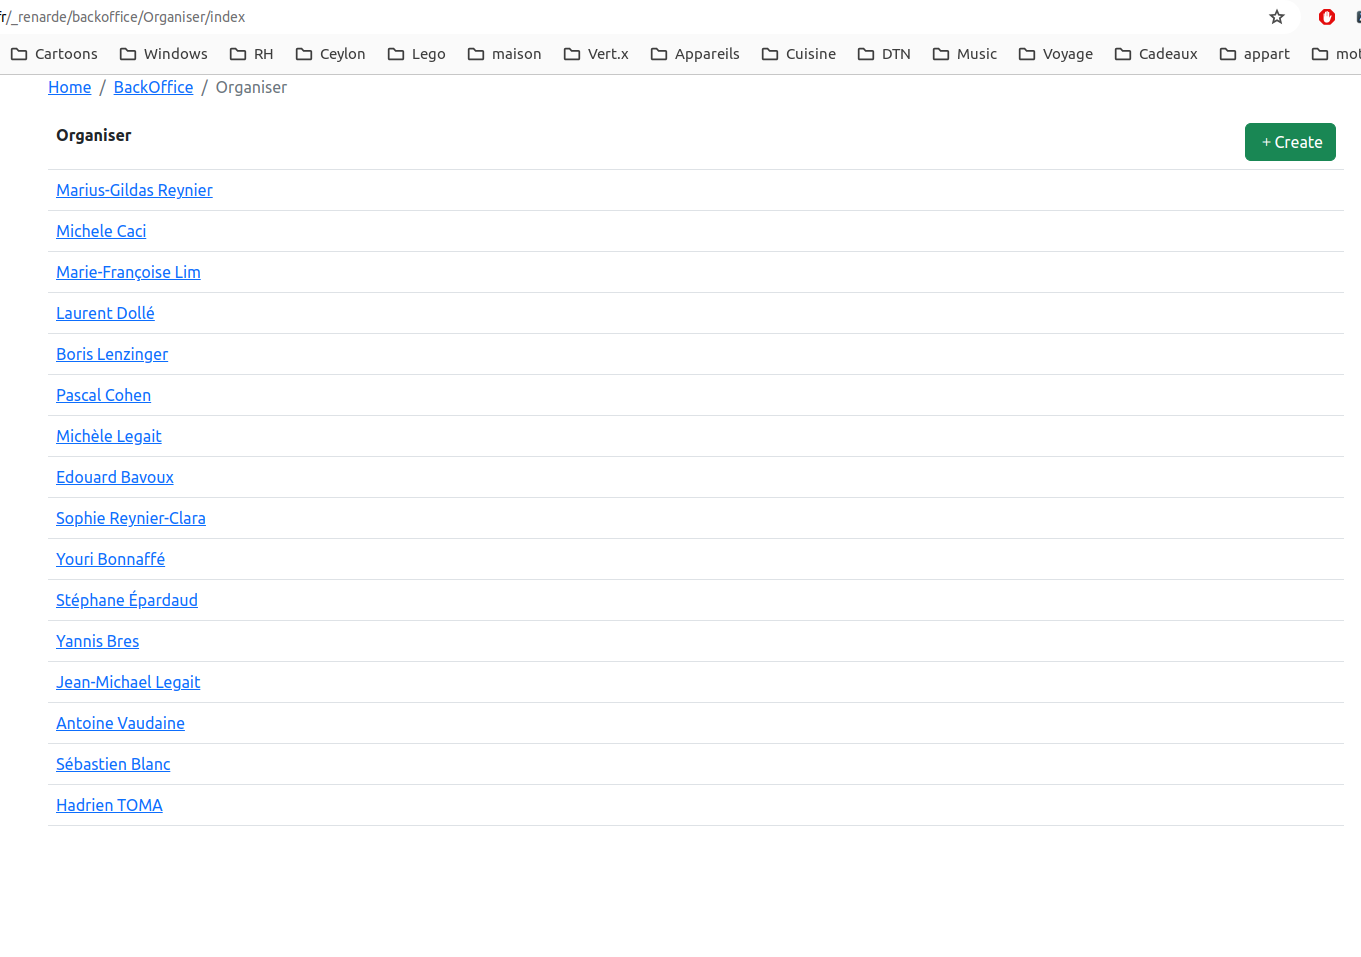
From there, you can either create or edit one entity:
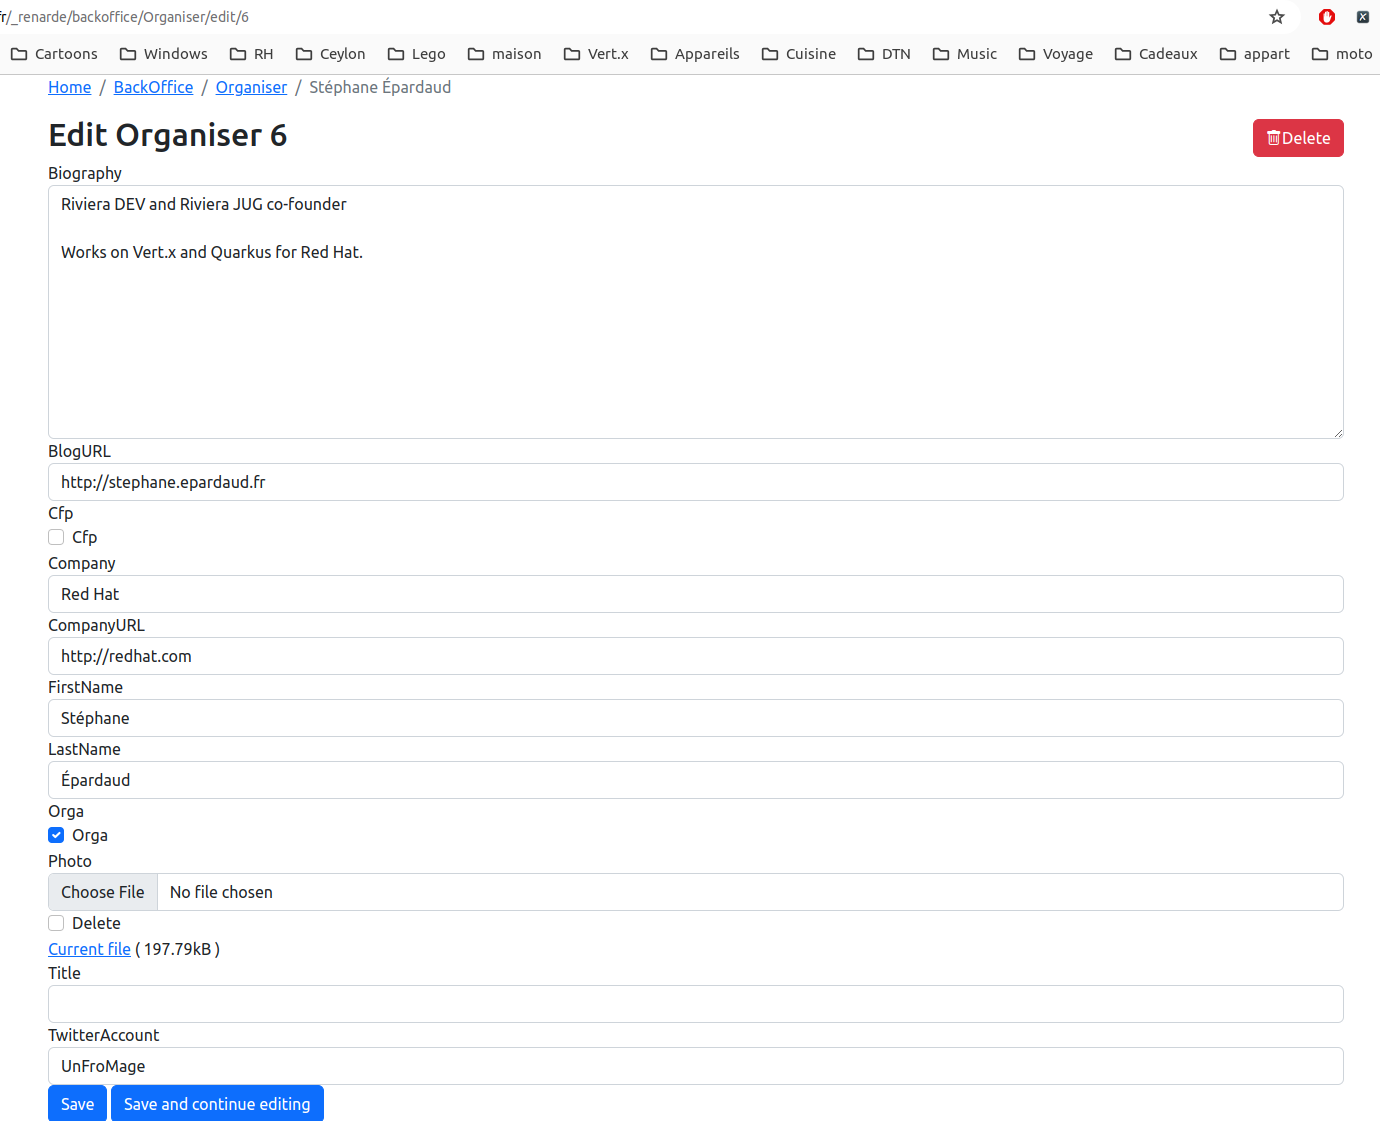
The generated forms and controllers support the following attribute types:
| Type/Annotation | Form element |
|---|---|
|
Checkbox |
|
Number input |
|
Text field of length 1 |
|
Text area |
|
Text input |
|
File input |
|
Text area |
|
DateTime input |
|
Date input |
|
Time input |
|
Timestamp input |
|
Select input with enum values |
|
Multiple-select input with possible values |
|
Multiple-select input with possible values |
|
Select input with possible values |
Database Transport
| This is an experimental API and feature, subject to change. |
Renarde can help you transport your entities' data from one place to another, which is a notoriously complex thing to do with entities with relations. Most people who need to serialise an entity to a format, such as JSON, need to annotate their model with special annotations, or write a custom serialiser and deserialiser, because out of the box, model entities have too many relations to translate directly to JSON.
On the other hand, if you do not care what the format of the serialised entity looks like, Renarde can automatically generate the proper serialisers and deserialisers for your entities, to make sure that you can serialise and deserialise them to JSON trivially using the Database Transporter module.
This way, you can easily expose some or all of your data from your production or test instances, such that DEV instances will automatically pick it up and seed their DEV database, which makes for much simpler development set-up, with useful data.
You must import the optional quarkus-renarde-transporter module.
<dependency>
  <groupId>io.quarkiverse.renarde</groupId>
  <artifactId>quarkus-renarde-transporter</artifactId>
  <version>3.0.12</version>
</dependency>
Now, if you wish to expose your serialised entities somewhere, you may write an endpoint like this one:
package rest;

import io.quarkiverse.renarde.Controller;
import io.quarkiverse.renarde.transporter.DatabaseTransporter;
import jakarta.transaction.Transactional;
import model.Configuration;
import model.Organiser;
import model.PreviousSpeaker;
import model.PricePack;
import model.PricePackDate;
import model.Slot;
import model.Speaker;
import model.Sponsor;
import model.Talk;
import model.TalkTheme;
import model.TalkType;
import model.TemporarySlot;
import model.Track;

public class Serialiser extends Controller {

  @Transactional
  public String json() {
    return DatabaseTransporter.export((entityType, fieldName, value) -> {
        // this will sanitise some data we wish to remove from the export
      if(entityType == Speaker.class) {
        // make sure we remove confidential info
        switch(fieldName) {
        case "email":
        case "phone":
          return null;
        }
      }
      return value;
    },
    // we want all of these entities
        Configuration.listAll(),
        Organiser.listAll(),
        PreviousSpeaker.listAll(),
        PricePack.listAll(),
        PricePackDate.listAll(),
        Slot.listAll(),
        Speaker.listAll(),
        Sponsor.listAll(),
        Talk.listAll(),
        TalkTheme.listAll(),
        TalkType.listAll(),
        TemporarySlot.listAll(),
        Track.listAll());
  }
}| Remember to not expose sensitive or private data publicly, or you should secure your endpoint. |
Now, if you want your DEV instances to pick up the data automatically from production or test servers, you can write the following startup class:
package util;

import java.io.IOException;
import java.io.InputStream;
import java.io.UncheckedIOException;
import java.net.URL;
import java.nio.charset.StandardCharsets;
import java.util.List;
import java.util.Map;
import java.util.Optional;

import org.eclipse.microprofile.config.inject.ConfigProperty;

import io.quarkiverse.renarde.transporter.DatabaseTransporter;
import io.quarkus.elytron.security.common.BcryptUtil;
import io.quarkus.hibernate.orm.panache.PanacheEntity;
import io.quarkus.hibernate.orm.panache.PanacheEntityBase;
import io.quarkus.logging.Log;
import io.quarkus.runtime.LaunchMode;
import io.quarkus.runtime.StartupEvent;
import jakarta.enterprise.context.ApplicationScoped;
import jakarta.enterprise.event.Observes;
import jakarta.transaction.Transactional;
import model.Configuration;
import model.Organiser;
import model.PreviousSpeaker;
import model.PricePack;
import model.PricePackDate;
import model.Slot;
import model.Speaker;
import model.Sponsor;
import model.Talk;
import model.TalkTheme;
import model.TalkType;
import model.TemporarySlot;
import model.Track;
import model.User;

@ApplicationScoped
public class Startup {

  @ConfigProperty(name = "dev-auto-setup.url")
  Optional<String> devAutoSetupUrl;

  /**
   * This method is executed at the start of your application
   */
  @Transactional
  public void start(@Observes StartupEvent evt) {
    // in DEV mode we seed some data
    if(LaunchMode.current() == LaunchMode.DEVELOPMENT) {
      if(devAutoSetupUrl.isPresent()) {
        String dataSource = devAutoSetupUrl.get();
        Log.infof("Loading data from %s", dataSource);
        try {
          try(InputStream is = new URL(dataSource).openStream()){
            String json = new String(is.readAllBytes(), StandardCharsets.UTF_8);
            // make sure we delete all previous test data
            Configuration.deleteAll();
            Organiser.deleteAll();
            PreviousSpeaker.deleteAll();
            PricePack.deleteAll();
            PricePackDate.deleteAll();
            Slot.deleteAll();
            Speaker.deleteAll();
            Sponsor.deleteAll();
            Talk.deleteAll();
            TalkTheme.deleteAll();
            TalkType.deleteAll();
            TemporarySlot.deleteAll();
            Track.deleteAll();
            Map<Class<?>,List<? extends PanacheEntityBase>> entities = DatabaseTransporter.importEntities(json);
            // Load the entities in the proper order: relation targets before relation owners
            for (Class<? extends PanacheEntityBase> entityType : DatabaseTransporter.sortedEntityTypes()) {
              List<? extends PanacheEntityBase> list = entities.get(entityType);
              if(list != null) {
                for (PanacheEntityBase entity : list) {
                  // remove the ID, to get a fresh entity
                  ((PanacheEntity)entity).id = null;
                  entity.persist();
                }
              }
            }
          }
        } catch (IOException e) {
          throw new UncheckedIOException(e);
        }
      }
    }
  }
}
And voilà! Your data is trivally transported from one server to another, using JSON, in a format you don’t care about ♥.