Renarde  Web Framework Security guide
Renarde can help you deal with security and user registration, either manually, using OIDC, or
a mix of both.
Custom authentication with JWT
In order to handle your own authentication by storing users in your database, you can use JWT tokens.
Start with importing the renarde-security module:
<dependency>
  <groupId>io.quarkiverse.renarde</groupId>
  <artifactId>quarkus-renarde-security</artifactId>
  <version>1.0.5</version>
</dependency>
And set those configuration values:
# Must be set to get proper error reporting
quarkus.http.auth.proactive=false
Your entity should extend RenardeUser and can look like this:
package model;

import java.util.HashSet;
import java.util.Set;

import javax.persistence.Column;
import javax.persistence.Entity;
import javax.persistence.EnumType;
import javax.persistence.Enumerated;
import javax.persistence.Table;

import io.quarkiverse.renarde.security.RenardeUser;
import io.quarkus.hibernate.orm.panache.PanacheEntity;

@Entity
@Table(name = "user_table")
public class User extends PanacheEntity implements RenardeUser {

    @Column(nullable = false)
    public String email;
    @Column(unique = true)
    public String userName;
    public String password;
    public String firstName;
    public String lastName;
    public boolean isAdmin;

    @Column(unique = true)
    public String confirmationCode;

    @Column(nullable = false)
    @Enumerated(EnumType.STRING)
    public UserStatus status;

    public boolean isRegistered(){
        return status == UserStatus.REGISTERED;
    }

    @Override
    public Set<String> getRoles() {
        Set<String> roles = new HashSet<>();
        if(isAdmin) {
            roles.add("admin");
        }
        return roles;
    }

    @Override
    public String getUserId() {
        return userName;
    }

    //
    // Helpers

    public static User findUnconfirmedByEmail(String email) {
        return find("LOWER(email) = ?1 AND status = ?2", email.toLowerCase(), UserStatus.CONFIRMATION_REQUIRED).firstResult();
    }

    public static User findRegisteredByUserName(String username) {
        return find("LOWER(userName) = ?1 AND status = ?2", username.toLowerCase(), UserStatus.REGISTERED).firstResult();
    }

    public static User findByUserName(String username) {
        return find("LOWER(userName) = ?1", username.toLowerCase()).firstResult();
    }

    public static User findForContirmation(String confirmationCode) {
        return find("confirmationCode = ?1 AND status = ?2", confirmationCode, UserStatus.CONFIRMATION_REQUIRED).firstResult();
    }
}
Now tell Renarde how to map the JWT cookies to your user model by implementing RenardeUserProvider:
package util;

import javax.enterprise.context.ApplicationScoped;
import javax.inject.Inject;

import io.quarkiverse.renarde.security.RenardeSecurity;
import io.quarkiverse.renarde.security.RenardeUser;
import io.quarkiverse.renarde.security.RenardeUserProvider;
import model.User;

@ApplicationScoped
public class MySecuritySetup implements RenardeUserProvider {

    @Inject
    RenardeSecurity security;

    @Override
    public RenardeUser findUser(String tenantId, String id) {
        return User.findByUserName(id);
    }
}
With this, Renarde will make sure that we produce a user named bean containing the current user if there is a
logged-in user. You can then use it in your views with inject:user or by injecting it in
your endpoints.
Renarde also provides a ControllerWithUser class which you can extend to access the current user for all controllers
that need a user.
Now you can write your login and registration page like this:
{#include main.html }
{#title}Login{/title}

<div class="row">
  <div class="col-md-5">
    {#form uri:Login.manualLogin()}
        <fieldset>
            <legend>Login</legend>
            {#formElement name="userName" label="User Name"}
                {#input name="userName"/}
            {/formElement}
            {#formElement name="password" label="Password"}
                {#input name="password" type="password"/}
            {/formElement}
            <button type="submit" class="btn btn-primary">Login</button>
        </fieldset>
    {/form}
  </div>
  <div class="col-md-5">
    {#form uri:Login.register()}
        <fieldset>
            <legend>Register</legend>
            {#formElement name="email" label="Email"}
                {#input name="email"/}
            {/formElement}
            <button type="submit" class="btn btn-primary">Register</button>
        </fieldset>
    {/form}
  </div>
</div>

{/include}
As for your registration page, it can look like this:
{#include main.html }
{#title}Complete registration{/title}

{#form uri:Login.complete(newUser.confirmationCode)}

<fieldset>
    <legend>Complete registration for {newUser.email}</legend>
    {#formElement name="userName" label="User Name"}
        {#input name="userName" value=newUser.userName/}
    {/formElement}
    {#formElement name="password" label="Password"}
        {#input name="password" type="password"/}
    {/formElement}
    {#formElement name="password2" label="Password Confirmation"}
        {#input name="password2" type="password"/}
    {/formElement}
    {#formElement name="firstName" label="First Name"}
        {#input name="firstName" value=newUser.firstName/}
    {/formElement}
    {#formElement name="lastName" label="Last Name"}
        {#input name="lastName" value=newUser.lastName/}
    {/formElement}
    <button type="submit" class="btn btn-primary">Complete registration</button>
</fieldset>

{/form}
{/include}
And your login and registration endpoint can look like this to handle user registration and login:
package rest;

import java.util.UUID;

import javax.inject.Inject;
import javax.validation.constraints.Email;
import javax.validation.constraints.NotBlank;
import javax.ws.rs.POST;
import javax.ws.rs.core.NewCookie;
import javax.ws.rs.core.Response;
import javax.ws.rs.core.Response.ResponseBuilder;

import org.hibernate.validator.constraints.Length;
import org.jboss.resteasy.reactive.RestForm;
import org.jboss.resteasy.reactive.RestQuery;

import email.Emails;
import io.quarkiverse.renarde.security.RenardeSecurity;
import io.quarkiverse.renarde.router.Router;
import io.quarkiverse.renarde.util.StringUtils;
import io.quarkus.elytron.security.common.BcryptUtil;
import io.quarkus.qute.CheckedTemplate;
import io.quarkus.qute.TemplateInstance;
import io.quarkus.security.Authenticated;
import model.User;
import model.UserStatus;

public class Login extends ControllerWithUser<User> {

    @Inject
    RenardeSecurity security;

    @CheckedTemplate
    static class Templates {
        public static native TemplateInstance login();
        public static native TemplateInstance register(String email);
        public static native TemplateInstance confirm(User newUser);
        public static native TemplateInstance logoutFirst();
        public static native TemplateInstance welcome();
    }

    /**
     * Login page
     */
    public TemplateInstance login() {
        return Templates.login();
    }

    /**
     * Welcome page at the end of registration
     */
    @Authenticated
    public TemplateInstance welcome() {
        return Templates.welcome();
    }

    /**
     * Manual login form
     */
    @POST
    public Response manualLogin(@NotBlank @RestForm String userName,
            @NotBlank @RestForm String password) {
        if(validationFailed()) {
            login();
        }
        User user = User.findRegisteredByUserName(userName);
        if(user == null
                || !BcryptUtil.matches(password, user.password)) {
            validation.addError("userName", "Invalid username/pasword");
            prepareForErrorRedirect();
            login();
        }
        NewCookie cookie = security.makeUserCookie(user);
        return Response.seeOther(Router.getURI(Application::index)).cookie(cookie).build();
    }


    /**
     * Manual registration form, sends confirmation email
     */
    @POST
    public TemplateInstance register(@RestForm @NotBlank @Email String email) {
        if(validationFailed())
            login();
        User newUser = User.findUnconfirmedByEmail(email);
        if(newUser == null) {
            newUser = new User();
            newUser.email = email;
            newUser.status = UserStatus.CONFIRMATION_REQUIRED;
            newUser.confirmationCode = UUID.randomUUID().toString();
            newUser.persist();
        }
        // send the confirmation code again
        Emails.confirm(newUser);
        return Templates.register(email);
    }


    /**
     * Confirmation form, once email is verified, to add user info
     */
    public TemplateInstance confirm(@RestQuery String confirmationCode){
        checkLogoutFirst();
        User newUser = checkConfirmationCode(confirmationCode);
        return Templates.confirm(newUser);
    }

    private void checkLogoutFirst() {
        if(getUser() != null) {
            logoutFirst();
        }
    }

    /**
     * Link to logout page
     */
    public TemplateInstance logoutFirst() {
        return Templates.logoutFirst();
    }

    private User checkConfirmationCode(String confirmationCode) {
        // can't use error reporting as those are query parameters and not form fields
        if(StringUtils.isEmpty(confirmationCode)){
            flash("message", "Missing confirmation code");
            flash("messageType", "error");
            redirect(Application.class).index();
        }
        User user = User.findForContirmation(confirmationCode);
        if(user == null){
            flash("message", "Invalid confirmation code");
            flash("messageType", "error");
            redirect(Application.class).index();
        }
        return user;
    }

    @POST
    public Response complete(@RestQuery String confirmationCode,
            @RestForm @NotBlank String userName,
            @RestForm @Length(min = 8) String password,
            @RestForm @Length(min = 8) String password2,
            @RestForm @NotBlank String firstName,
            @RestForm @NotBlank String lastName) {
        checkLogoutFirst();
        User user = checkConfirmationCode(confirmationCode);

        if(validationFailed())
            confirm(confirmationCode);

        validation.required("password", password);
        validation.required("password2", password2);
        validation.equals("password", password, password2);

        if(User.findRegisteredByUserName(userName) != null)
            validation.addError("userName", "User name already taken");
        if(validationFailed())
            confirm(confirmationCode);

        user.userName = userName;
        user.password = BcryptUtil.bcryptHash(password);
        user.firstName = firstName;
        user.lastName = lastName;
        user.confirmationCode = null;
        user.status = UserStatus.REGISTERED;

        ResponseBuilder responseBuilder = Response.seeOther(Router.getURI(Login::welcome));
        NewCookie cookie = security.makeUserCookie(user);
        responseBuilder.cookie(cookie);
        return responseBuilder.build();
    }
}
You can now use the @Authenticated and @RolesAllowed("admin") annotations on your endpoints.
Private/public keys
In DEV mode, your private/public keys will be generated for you at startup if they do not exist and are not specified. Cleaning your project will remove those keys, so previous JWT tokens won’t be valid anymore on restart.
In production environments you will need to generate and specify your private and public keys using the following commands:
$ openssl genrsa -out rsaPrivateKey.pem 2048
$ openssl rsa -pubout -in rsaPrivateKey.pem -out src/main/resources/publicKey.pem
$ openssl pkcs8 -topk8 -nocrypt -inform pem -in rsaPrivateKey.pem -outform pem -out src/main/resources/privateKey.pem
You can then point to those files in your application.properties Quarkus configuration:
mp.jwt.verify.publickey.location=publicKey.pem
mp.jwt.decrypt.key.location=privateKey.pem
smallrye.jwt.sign.key.location=privateKey.pem
smallrye.jwt.encrypt.key.location=publicKey.pem

quarkus.native.resources.includes=publicKey.pem
quarkus.native.resources.includes=privateKey.pem
Using OIDC for login
OIDC (Open ID Connect) is a way to delegate user login to external services, such as:
If you use OIDC, you can skip the email validation phase, and avoid storing passwords for your users, but you may likely still need to store a user representation in your data store, and associate it to the external identity provider using the provider name and its own ID.
The recommended set up is to place each provider in its own tenant, and disable the default tenant if you want to leave it free for the manual user registration and authentication we already covered:
# Google
quarkus.oidc.google.provider=google
quarkus.oidc.google.client-id=SECRET
quarkus.oidc.google.credentials.secret=SECRET

# Github
quarkus.oidc.github.provider=github
quarkus.oidc.github.client-id=SECRET
quarkus.oidc.github.credentials.secret=SECRET

# Manual context
quarkus.oidc.manual.tenant-enabled=false

# Default is just disabled
quarkus.oidc.tenant-enabled=false

# Get rid of keycloak dev services
quarkus.keycloak.devservices.enabled=false

# Must be set to get proper error reporting
quarkus.http.auth.proactive=false
Make sure you import the renarde-oidc module in your pom.xml:
<dependency>
  <groupId>io.quarkiverse.renarde</groupId>
  <artifactId>quarkus-renarde-oidc</artifactId>
  <version>1.0.5</version>
</dependency>
We first adapt our User model to handle OIDC users by adding tenantId and authId fields:
package model;

import java.util.HashSet;
import java.util.Set;

import javax.persistence.Column;
import javax.persistence.Entity;
import javax.persistence.EnumType;
import javax.persistence.Enumerated;
import javax.persistence.Table;
import javax.persistence.UniqueConstraint;

import io.quarkiverse.renarde.security.RenardeUser;
import io.quarkus.hibernate.orm.panache.PanacheEntity;

@Entity
@Table(name = "user_table", uniqueConstraints = @UniqueConstraint(columnNames = {"tenantId", "authId"}))
public class User extends PanacheEntity implements RenardeUser {

    @Column(nullable = false)
    public String email;
    @Column(unique = true)
    public String userName;
    public String password;
    public String firstName;
    public String lastName;
    public boolean isAdmin;

    @Column(unique = true)
    public String confirmationCode;

    public String tenantId;
    public String authId;

    @Column(nullable = false)
    @Enumerated(EnumType.STRING)
    public UserStatus status;

    public boolean isRegistered(){
        return status == UserStatus.REGISTERED;
    }

    @Override
    public Set<String> getRoles() {
        Set<String> roles = new HashSet<>();
        if(isAdmin) {
            roles.add("admin");
        }
        return roles;
    }

    @Override
    public String getUserId() {
        return userName;
    }

    public boolean isOidc() {
        return tenantId != null;
    }

    //
    // Helpers

    public static User findUnconfirmedByEmail(String email) {
        return find("LOWER(email) = ?1 AND status = ?2", email.toLowerCase(), UserStatus.CONFIRMATION_REQUIRED).firstResult();
    }

    public static User findRegisteredByUserName(String username) {
        return find("LOWER(userName) = ?1 AND status = ?2", username.toLowerCase(), UserStatus.REGISTERED).firstResult();
    }

    public static User findByUserName(String username) {
        return find("LOWER(userName) = ?1", username.toLowerCase()).firstResult();
    }

    public static User findByAuthId(String tenantId, String authId) {
        return find("tenantId = ?1 AND authId = ?2", tenantId, authId).firstResult();
    }

    public static User findForContirmation(String confirmationCode) {
        return find("confirmationCode = ?1 AND status = ?2", confirmationCode, UserStatus.CONFIRMATION_REQUIRED).firstResult();
    }
}
Now you need to provide implementations of RenardeUserProvider and RenardeOidcHandler which you can group:
package util;

import java.net.URI;
import java.util.UUID;

import javax.enterprise.context.ApplicationScoped;
import javax.inject.Inject;
import javax.transaction.Transactional;
import javax.ws.rs.core.Response;

import io.quarkiverse.renarde.oidc.RenardeOidcHandler;
import io.quarkiverse.renarde.oidc.RenardeOidcSecurity;
import io.quarkiverse.renarde.security.RenardeSecurity;
import io.quarkiverse.renarde.security.RenardeUser;
import io.quarkiverse.renarde.security.RenardeUserProvider;
import io.quarkiverse.renarde.router.Router;
import io.quarkiverse.renarde.util.Flash;
import io.quarkiverse.renarde.util.RedirectException;
import model.User;
import model.UserStatus;
import rest.Application;
import rest.Login;

@ApplicationScoped
public class MySecuritySetup implements RenardeUserProvider, RenardeOidcHandler {

    @Inject
    RenardeSecurity security;

    @Inject
    RenardeOidcSecurity oidcSecurity;

    @Inject
    Flash flash;

    /**
     * This allows us to map tenant/id to our users: manually or via OIDC
     */
    @Override
    public RenardeUser findUser(String tenantId, String id) {
        if(tenantId == null || tenantId.equals("manual")) {
            return User.findByUserName(id);
        } else {
            return User.findByAuthId(tenantId, id);
        }
    }

    /**
     * This will be called on every successful OIDC authentication,
     * be it a first-time user registration, or existing user login
     */
    @Transactional
    @Override
    public void oidcSuccess(String tenantId, String authId) {
        User user = User.findByAuthId(tenantId, authId);
        URI uri;
        if(user == null) {
            // registration
            user = new User();
            user.tenantId = tenantId;
            user.authId = authId;

            user.email = oidcSecurity.getOidcEmail();
            user.firstName = oidcSecurity.getOidcFirstName();
            user.lastName = oidcSecurity.getOidcLastName();
            user.userName = oidcSecurity.getOidcUserName();

            user.status = UserStatus.CONFIRMATION_REQUIRED;
            user.confirmationCode = UUID.randomUUID().toString();
            user.persist();

            // go to registration
            uri = Router.getURI(Login::confirm, user.confirmationCode);
        } else if(!user.isRegistered()) {
            // user exists, but not fully registered yet
            // go to registration
            uri = Router.getURI(Login::confirm, user.confirmationCode);
        } else {
            // regular login
            uri = Router.getURI(Application::index);
        }
        throw new RedirectException(Response.seeOther(uri).build());
    }

    /**
     * This will be called if the existing user has a valid OIDC session,
     * and attemps to login again, so we check if the user exists, and is
     * fully registered.
     */
    @Override
    public void loginWithOidcSession(String tenantId, String authId) {
        RenardeUser user = findUser(tenantId, authId);
        // old cookie, no such user
        if(user == null) {
            flash.flash("message", "Invalid user: "+authId);
            throw new RedirectException(security.makeLogoutResponse());
        }
        // redirect to registration
        URI uri;
        if(!user.isRegistered()) {
            uri = Router.getURI(Login::confirm, ((User)user).confirmationCode);
        } else {
            flash.flash("message", "Already logged in");
            uri = Router.getURI(Application::index);
        }
        throw new RedirectException(Response.seeOther(uri).build());
    }
}
We have to adapt our registration page to account for users coming in from OIDC, by skipping the password if the user is an OIDC user:
{#include main.html }
{#title}Complete registration{/title}

{#form uri:Login.complete(newUser.confirmationCode)}

<fieldset>
    <legend>Complete registration for {newUser.email}</legend>
    {#formElement name="userName" label="User Name"}
        {#input name="userName" value=newUser.userName/}
    {/formElement}
    {#if !newUser.authId}
        {#formElement name="password" label="Password"}
            {#input name="password" type="password"/}
        {/formElement}
        {#formElement name="password2" label="Password Confirmation"}
            {#input name="password2" type="password"/}
        {/formElement}
    {/if}
    {#formElement name="firstName" label="First Name"}
        {#input name="firstName" value=newUser.firstName/}
    {/formElement}
    {#formElement name="lastName" label="Last Name"}
        {#input name="lastName" value=newUser.lastName/}
    {/formElement}
    <button type="submit" class="btn btn-primary">Complete registration</button>
</fieldset>

{/form}
{/include}
And the corresponding controller:
    @POST
    public Response complete(@RestQuery String confirmationCode,
            @RestForm @NotBlank String userName,
            @RestForm @Length(min = 8) String password,
            @RestForm @Length(min = 8) String password2,
            @RestForm @NotBlank String firstName,
            @RestForm @NotBlank String lastName) {
        checkLogoutFirst();
        User user = checkConfirmationCode(confirmationCode);

        if(validationFailed())
            confirm(confirmationCode);

        // is it OIDC?
        if(!user.isOidc()) {
            validation.required("password", password);
            validation.required("password2", password2);
            validation.equals("password", password, password2);
        }

        if(User.findRegisteredByUserName(userName) != null)
            validation.addError("userName", "User name already taken");
        if(validationFailed())
            confirm(confirmationCode);

        user.userName = userName;
        if(!user.isOidc()) {
            user.password = BcryptUtil.bcryptHash(password);
        }
        user.firstName = firstName;
        user.lastName = lastName;
        user.confirmationCode = null;
        user.status = UserStatus.REGISTERED;

        ResponseBuilder responseBuilder = Response.seeOther(Router.getURI(Login::welcome));
        if(!user.isOidc()) {
            NewCookie cookie = security.makeUserCookie(user);
            responseBuilder.cookie(cookie);
        }
        return responseBuilder.build();
    }
And finally we can add the OIDC login options to the login page:
{#include main.html }
{#title}Login{/title}

<div class="row">
  <div class="col-md-2">
    <fieldset>
        <legend>Login/Register</legend>
        <div class="d-grid gap-2">
          <a class="btn btn-block btn-light" href="{uri:RenardeSecurityController.loginUsingOidc('github')}" role="button"><img src="/images/signin-github.svg" height="16px" style="vertical-align: text-top"/> GitHub</a>
          <a class="btn btn-block btn-light" href="{uri:RenardeSecurityController.loginUsingOidc('google')}" role="button"><img src="/images/signin-google.svg" height="16px" style="vertical-align: text-top"/> Google</a>
          <a class="btn btn-block btn-light" href="{uri:RenardeSecurityController.loginUsingOidc('microsoft')}" role="button"><img src="/images/signin-microsoft.svg" height="16px" style="vertical-align: text-top"/> Microsoft</a>
          <a class="btn btn-block btn-light" href="{uri:RenardeSecurityController.loginUsingOidc('facebook')}" role="button"><img src="/images/signin-facebook.svg" height="16px" style="vertical-align: text-top"/> Facebook</a>
          <a class="btn btn-block btn-light" href="{uri:RenardeSecurityController.loginUsingOidc('apple')}" role="button"><img src="/images/signin-apple.svg" height="16px" style="vertical-align: text-top"/> Apple</a>
          <a class="btn btn-block btn-light" href="{uri:RenardeSecurityController.loginUsingOidc('twitter')}" role="button"><img src="/images/signin-twitter.svg" height="16px" style="vertical-align: text-top"/> Twitter</a>
        </div>
     </fieldset>
  </div>
  <-- ... Manual login and registration ... -->
</div>

{/include}
Setting up OIDC for Github
In order to set up OIDC for Github you need to create a new OAuth application in your GitHub developer settings:
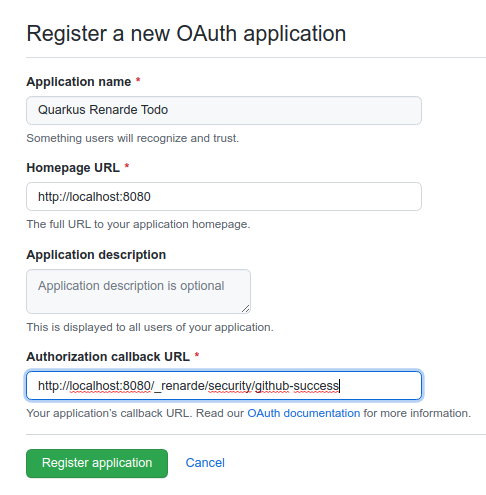
Make sure to fill in the appropriate details, but more importantly the Authorization Callback URL, set to http://localhost:8080/_renarde/security/github-success
(if you intend to test this using the Quarkus DEV mode).
Now click on Register application and you’ll be shown your application page:
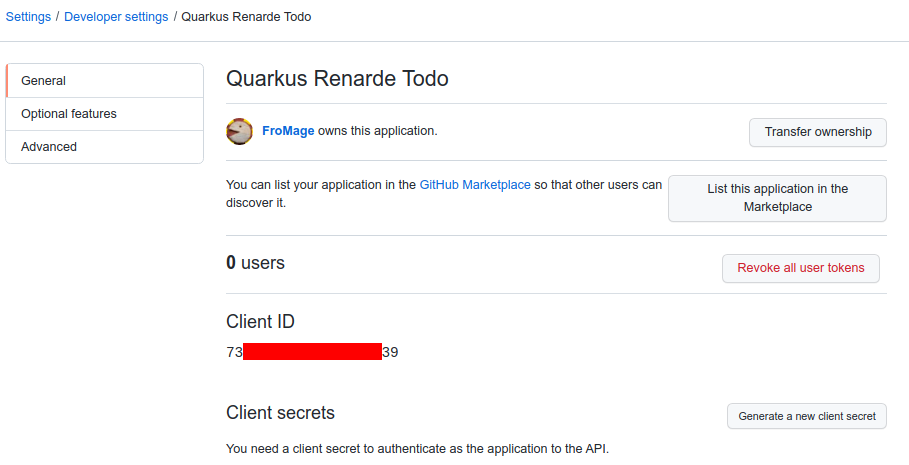
You need to click on Generate a new client secret, confirm your credentials, and write down
your Client ID and Client secret (especially that one, because you will not be able to see it again
later from that page, but you can always recreate one, do don’t worry too much):
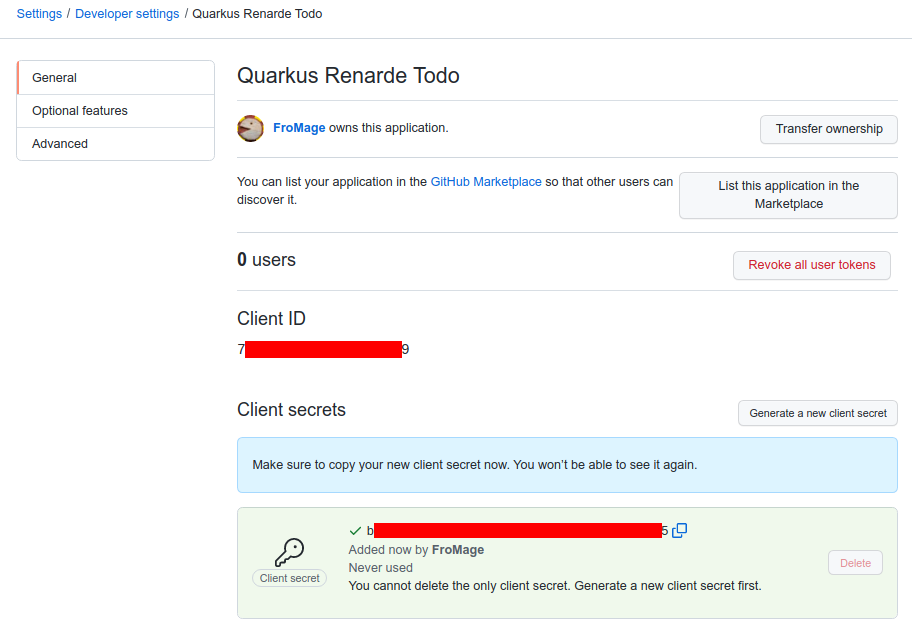
Now add the following configuration to your application.properties:
quarkus.oidc.github.provider=github
quarkus.oidc.github.client-id=<Client ID>
quarkus.oidc.github.credentials.secret=<Secret>
Setting up OIDC for Google
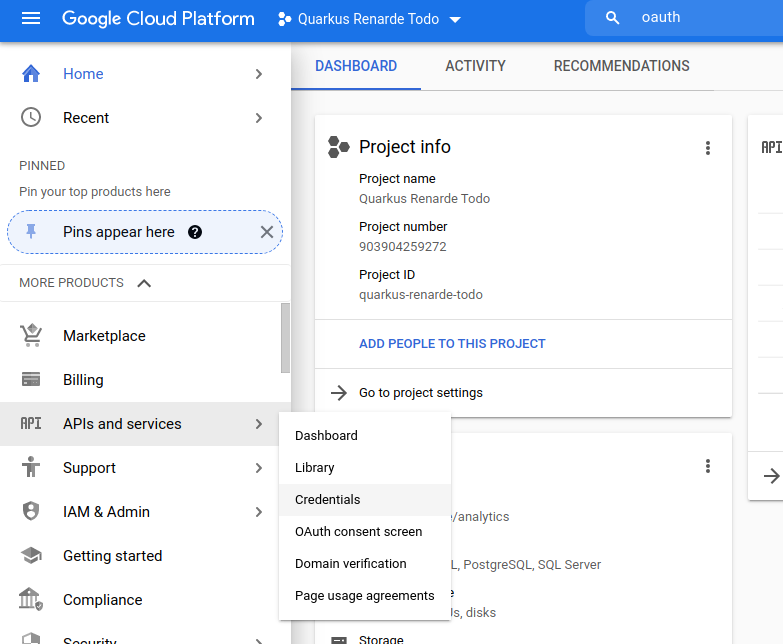
In order to set up OIDC for Google you need to create a new project in your Google Cloud Platform console:
Pick a project name and click on CREATE.

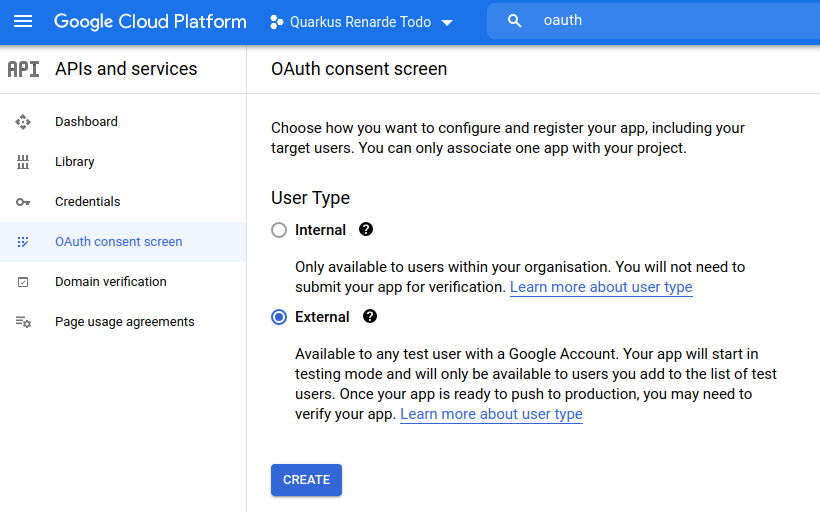
Now make sure you select your project in the top selector, and click on the left-hand bar menu on APIs and Services > OAuth consent screen:
Select External to authorise any Google user to log in to your application and press CREATE:
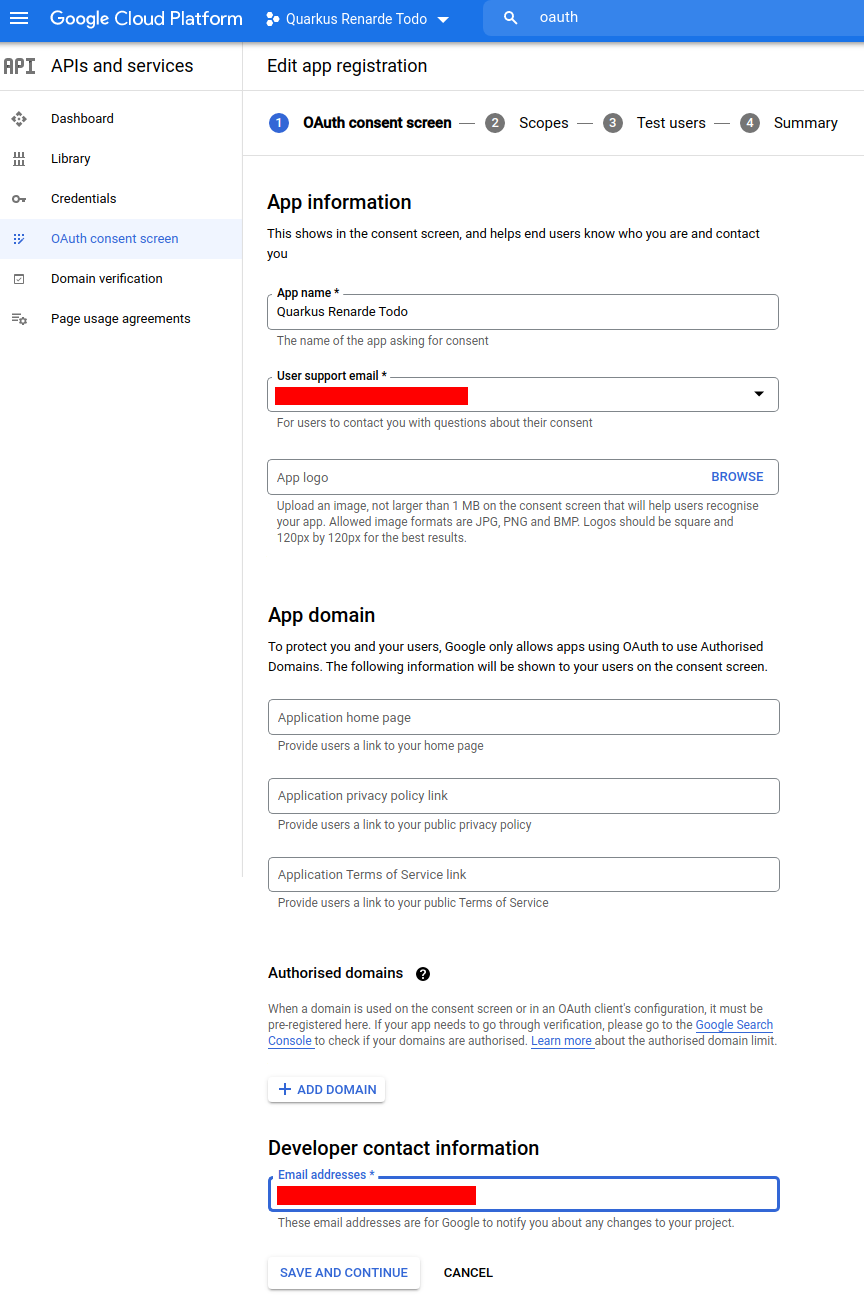
Now you can fill in your application name, your support email, your developer contact information and press SAVE AND CONTINUE:
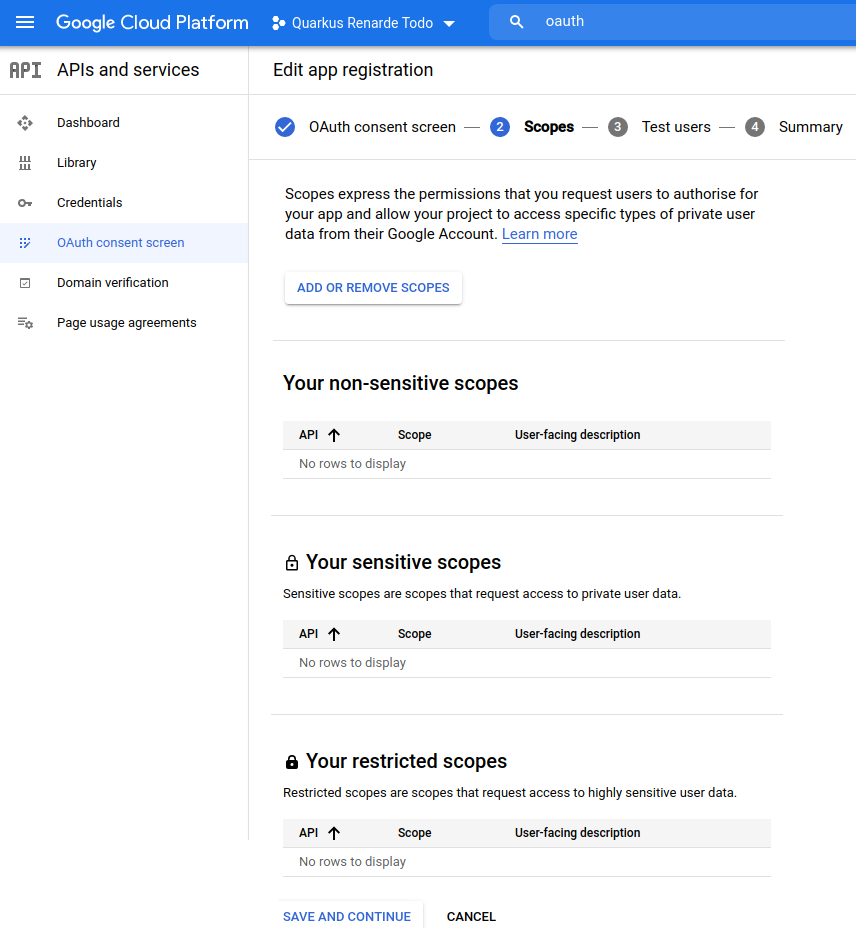
Do not add any scopes on the next page, and press SAVE AND CONTINUE:
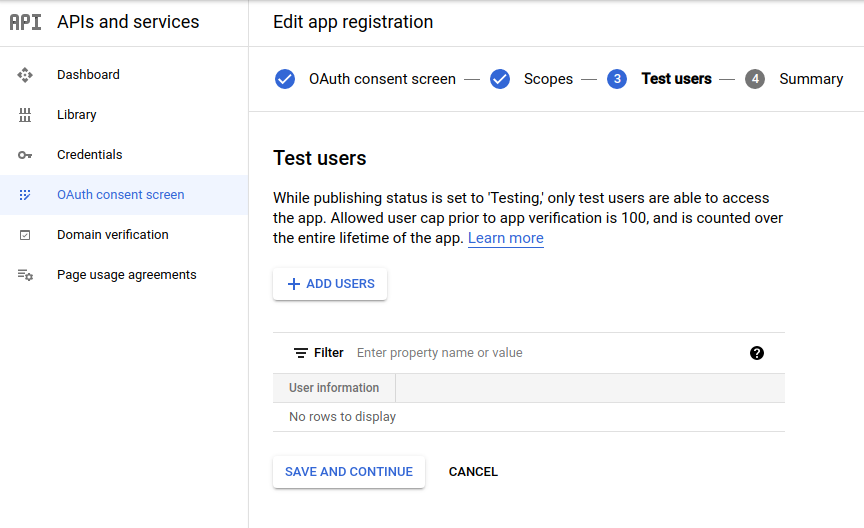
Do not add any test user on the next page, and press SAVE AND CONTINUE:
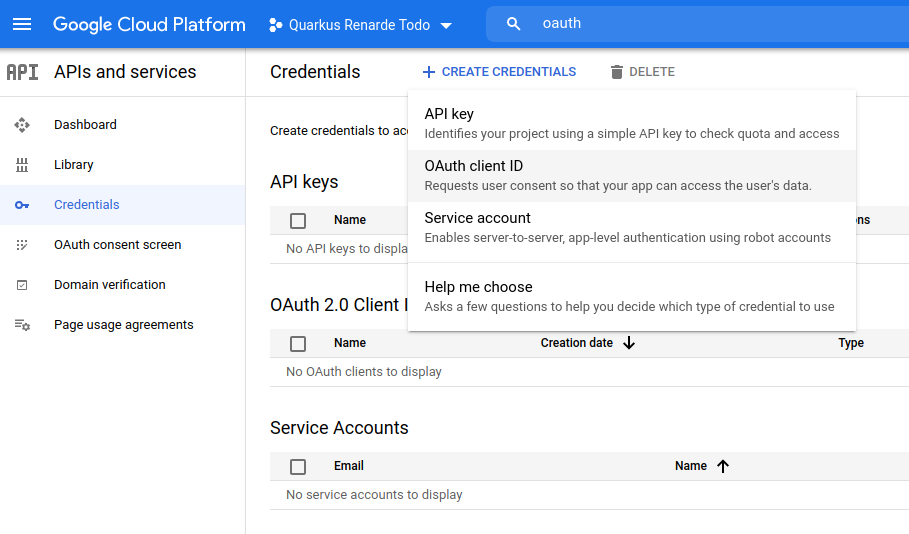
Click on the top menu CREATE CREDENTIALS > OAuth client ID:
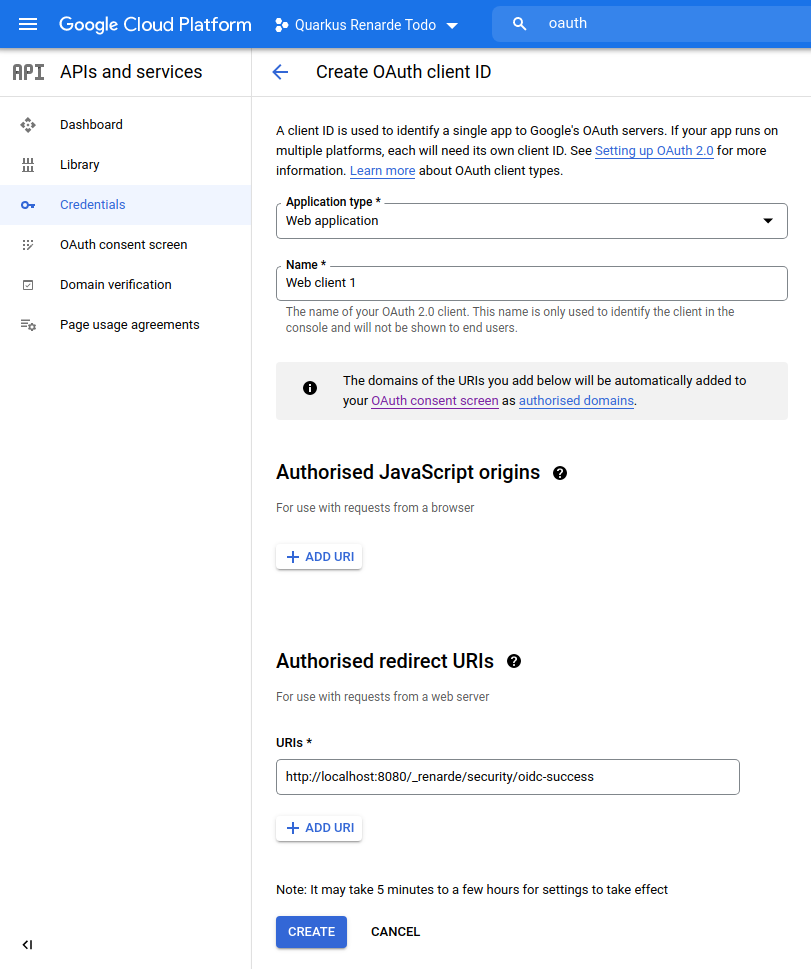
Select Web application as Application type, and add http://localhost:8080/_renarde/security/oidc-success in
the Authorised redirect URIs list, then press CREATE:
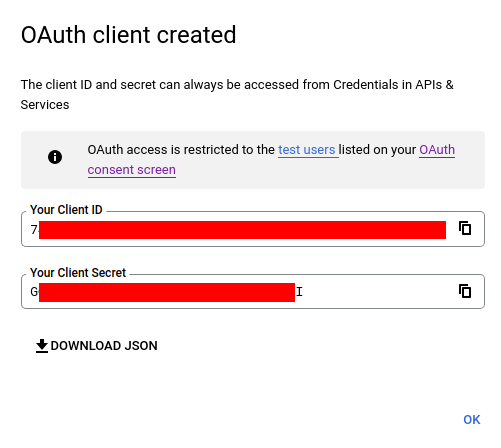
Copy your Client ID and Client Secret:
You can now configure your application.properties:
quarkus.oidc.google.provider=google
quarkus.oidc.google.client-id=<Client ID>
quarkus.oidc.google.credentials.secret=<Secret>
Setting up OIDC for Microsoft
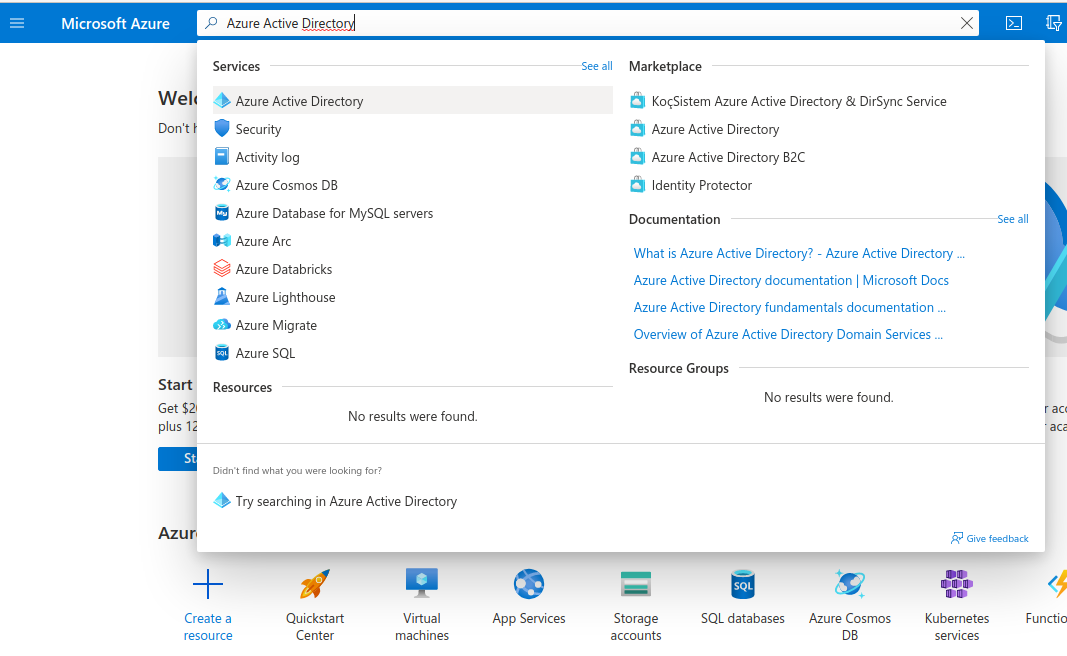
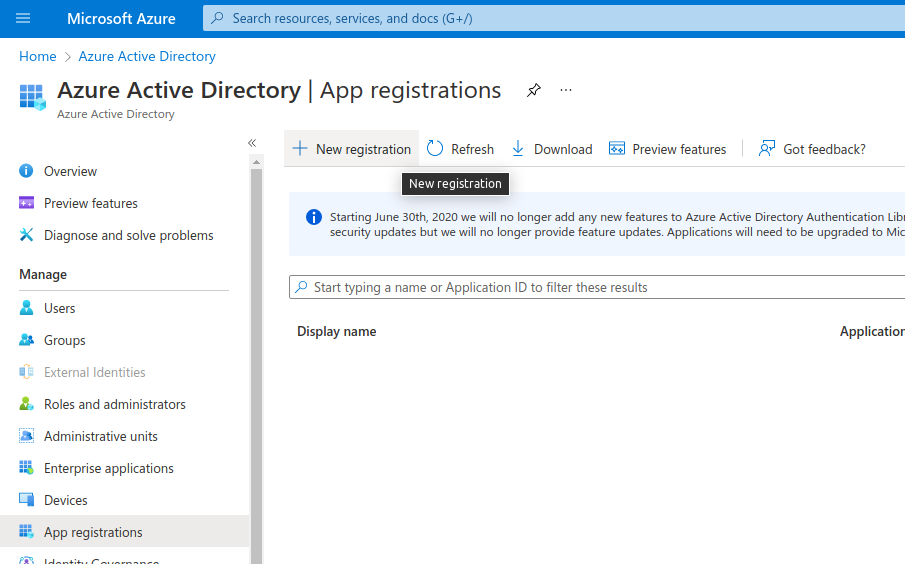
In order to set up OIDC for Microsoft you need to go to your Microsoft Azure Portal,
and search for Azure Active Directory, then click on it:
Once there, on the left side under Manage, click on App registrations then click on New registration:
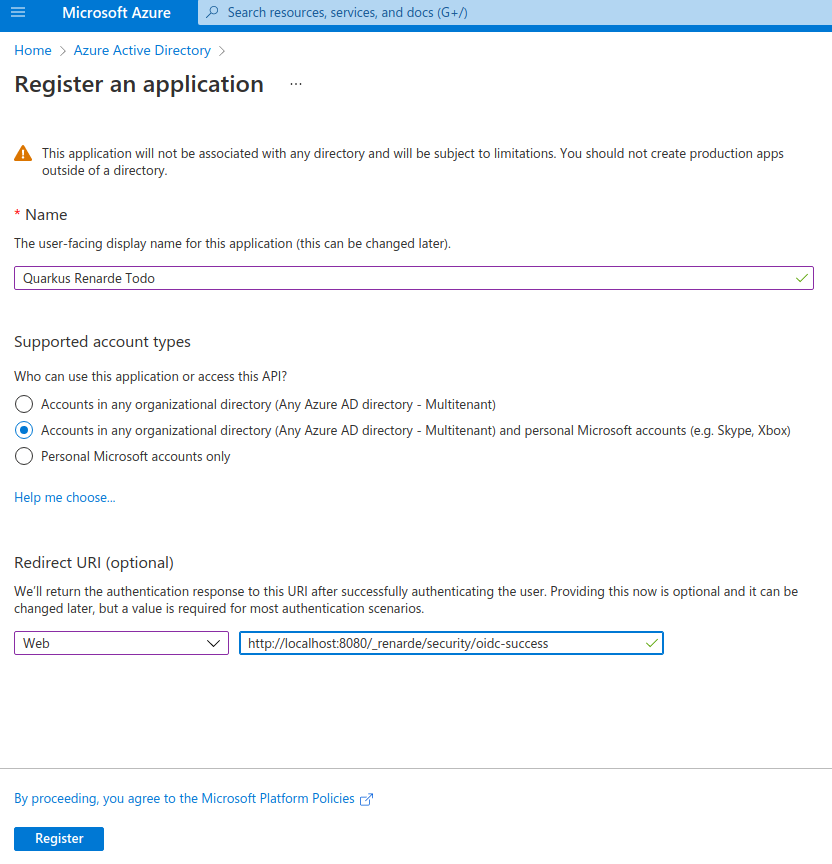
Fill in your application name, select Accounts in any organizational directory (Any Azure AD directory - Multitenant) and personal Microsoft accounts (e.g. Skype, Xbox) to allow anyone to log in, and add a Web Redirect URI as http://localhost:8080/_renarde/security/oidc-success,
then click on Register:
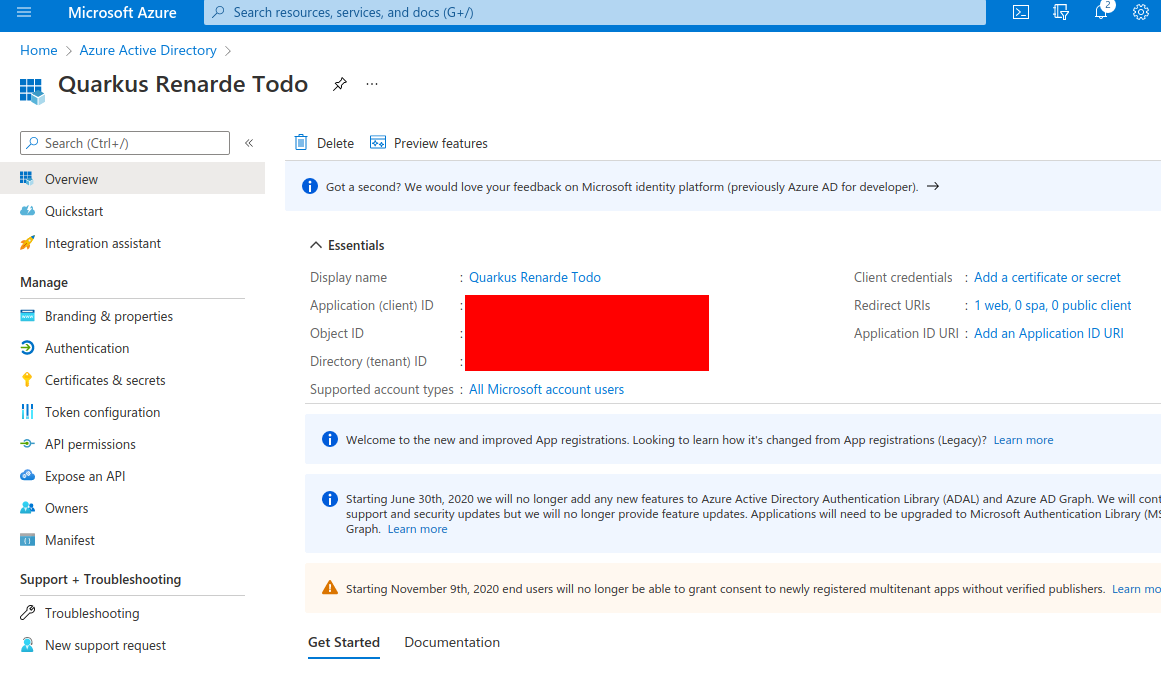
On that resulting page, copy the Client Id (under Application (client) ID, then click on Add a certificate or secret:
Now, under Client secrets (0), click on New client secret:

Click on Add in that dialog without changing anything:
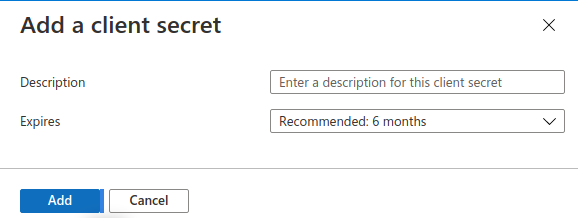
On the resulting page, copy your Secret ID:
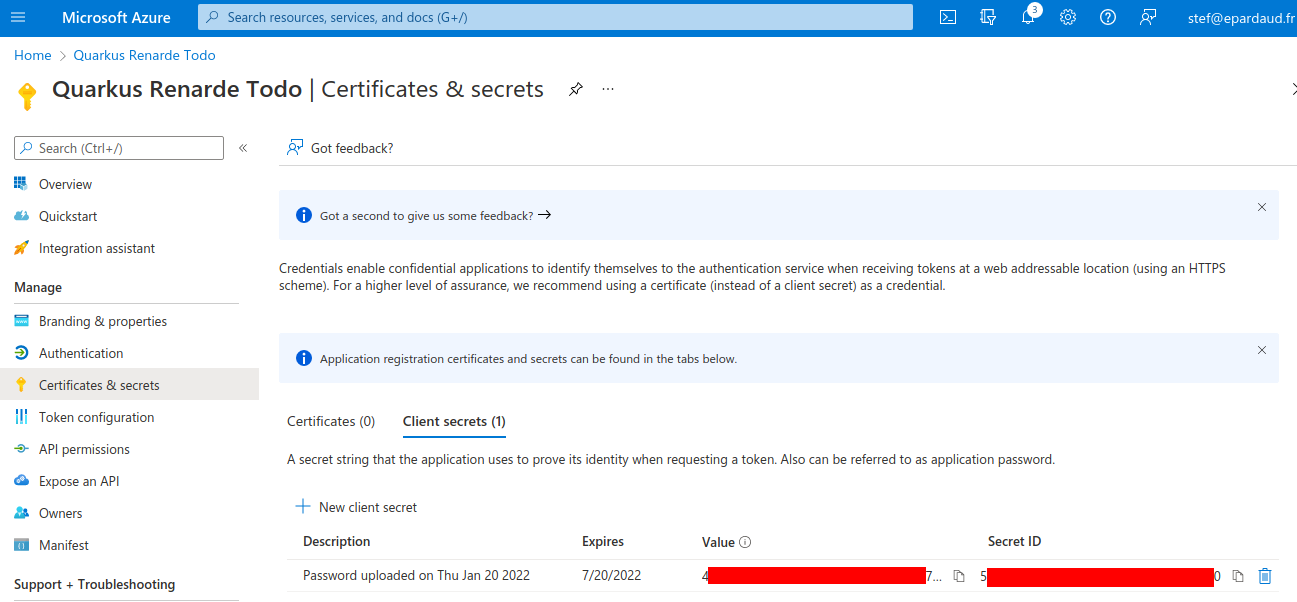
You can now configure your application.properties:
quarkus.oidc.microsoft.provider=microsoft
quarkus.oidc.microsoft.client-id=<Client ID>
quarkus.oidc.microsoft.credentials.secret=<Secret>
Setting up OIDC for Apple
In order to set up OIDC for Apple you need to create a developer account, and sign up for the 99€/year program, but you cannot test your application on localhost like most other OIDC providers:
you will need to run it over https and make it publicly accessible, so for development purposes
you may want to use a service such as https://ngrok.com.
Go to Create a new identifier and press +
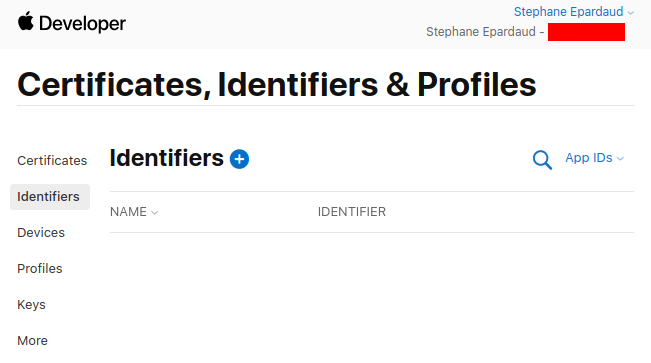
Dont touch anything, keep App IDs selected, and press Continue:
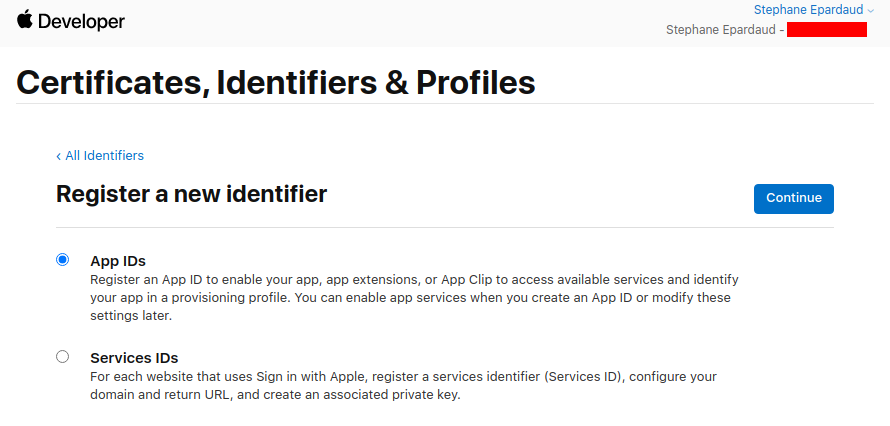
Dont touch anything, keep App selected, and press Continue:
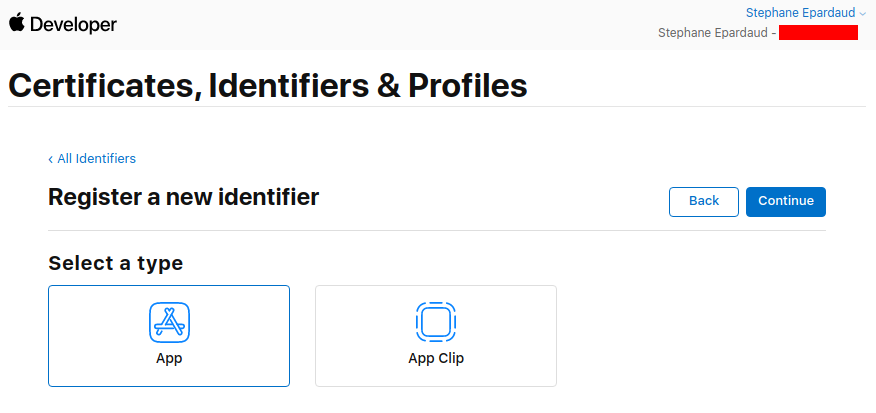
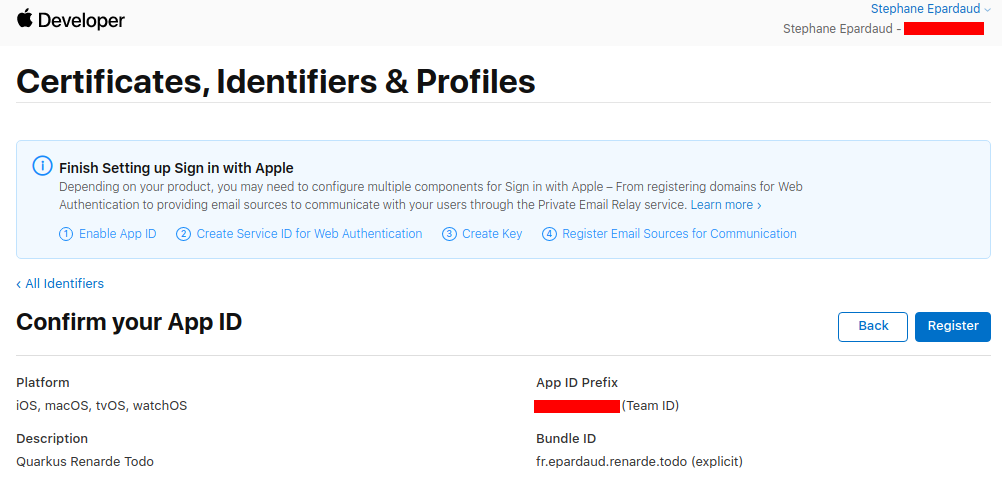
Enter a description and a Bundle ID (use your application package name):

Then scroll down to find the Sign in with Apple Capability, select it, and press Continue:
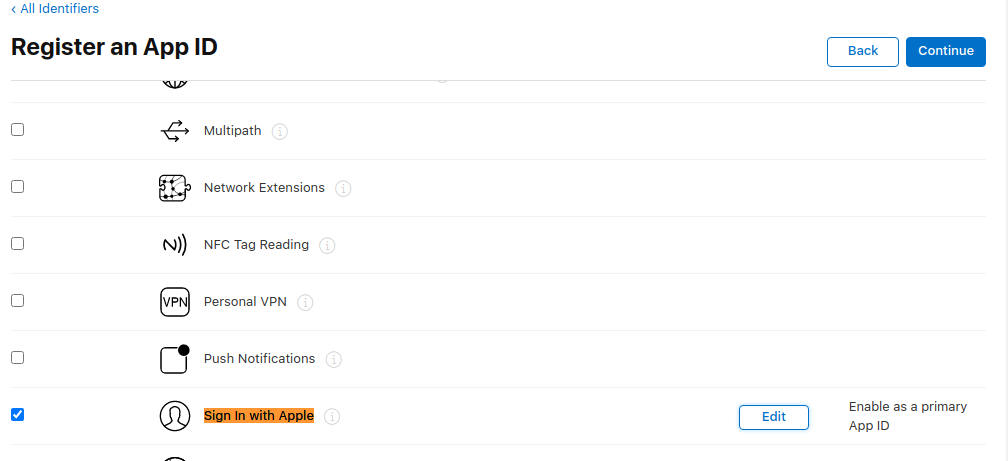
Write down your App ID Prefix, then press Register:
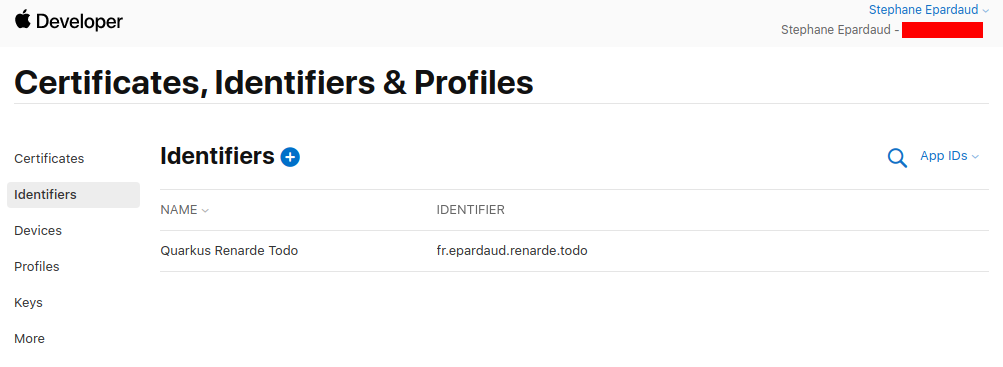
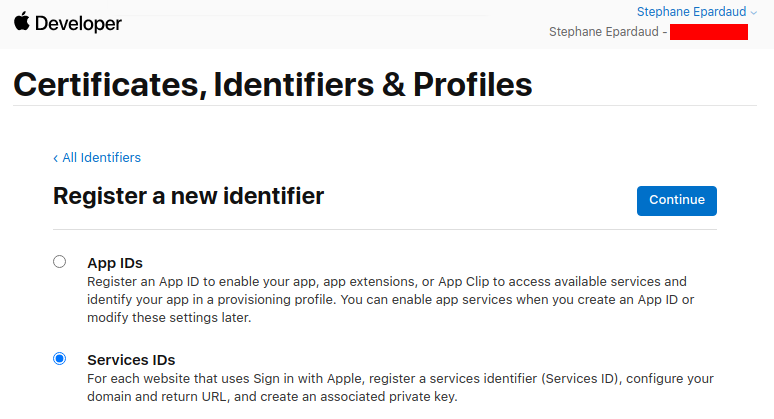
Back on the Identifiers page, press +:
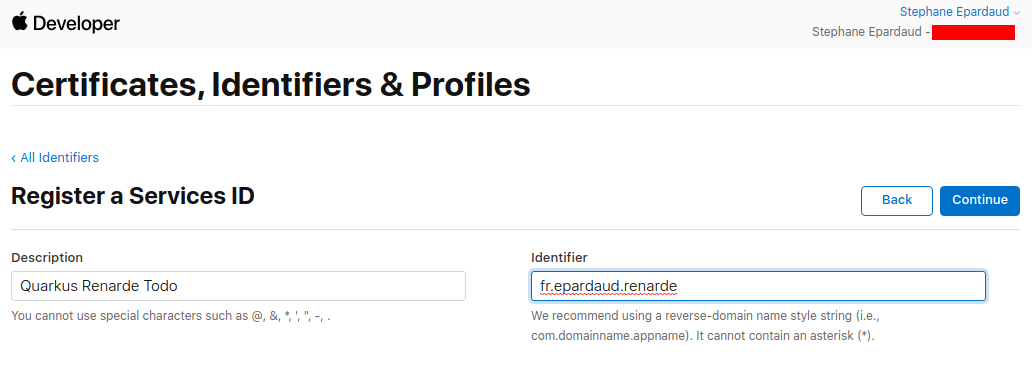
Select Service IDs and press Continue:
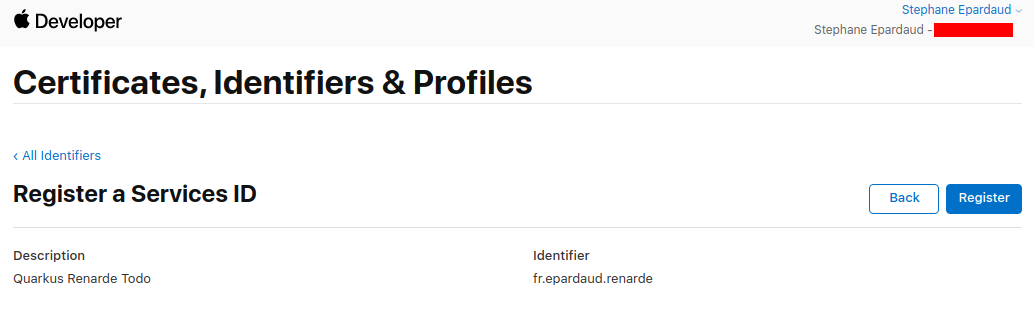
Enter a description and Bundle ID (use your application package name), then press Continue:
Now press Register:
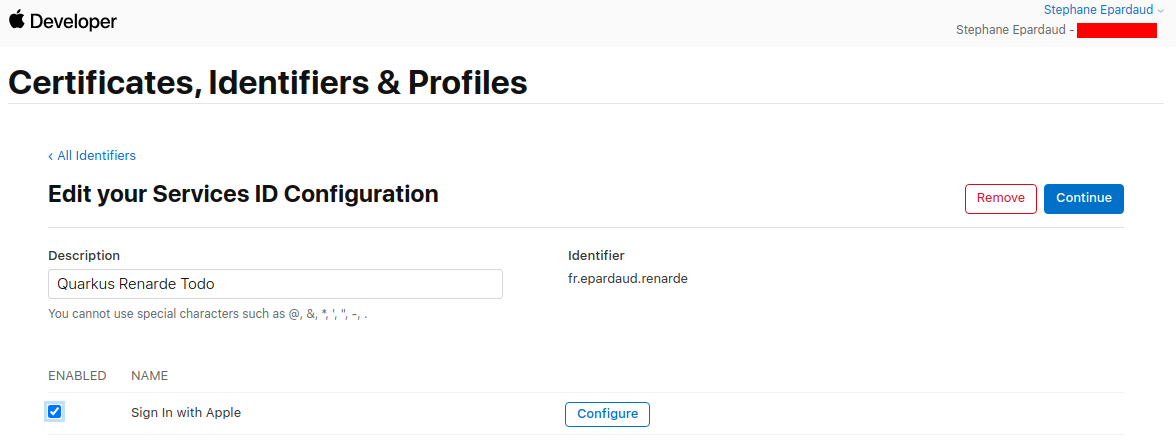
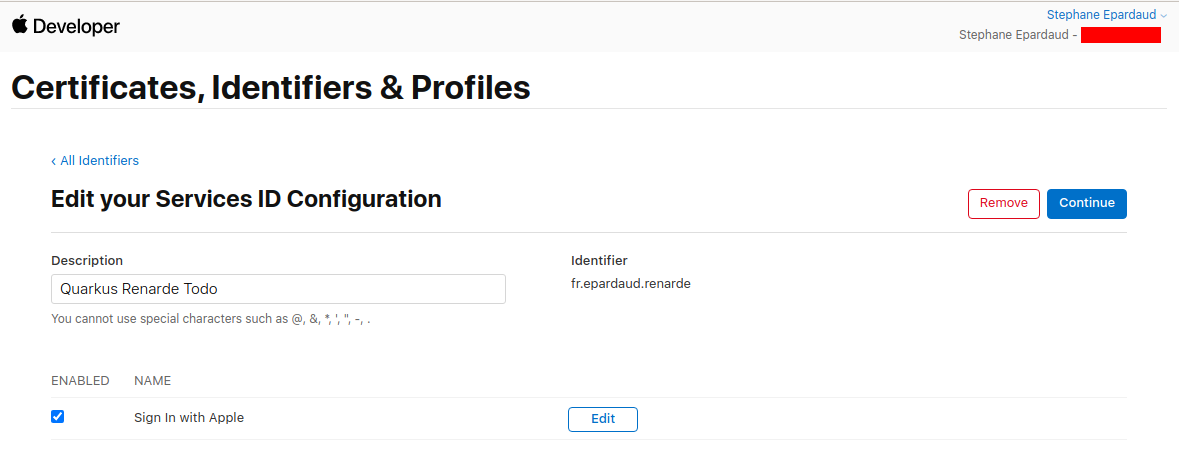
Back on the service list, click on your newly created service:

Enable Sign in with Apple and press Configure:
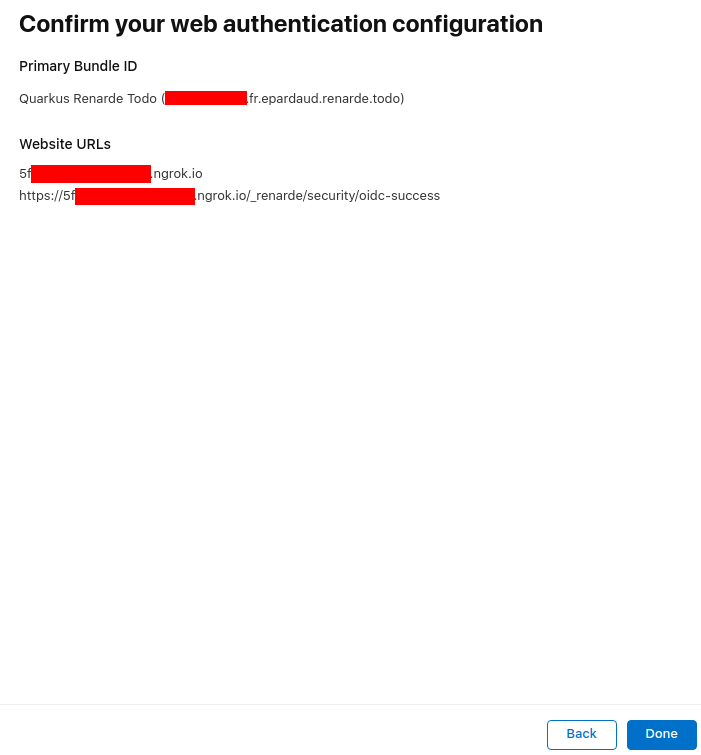
Add your domain and return URL (set to <host>/_renarde/security/oidc-success) and press Next:
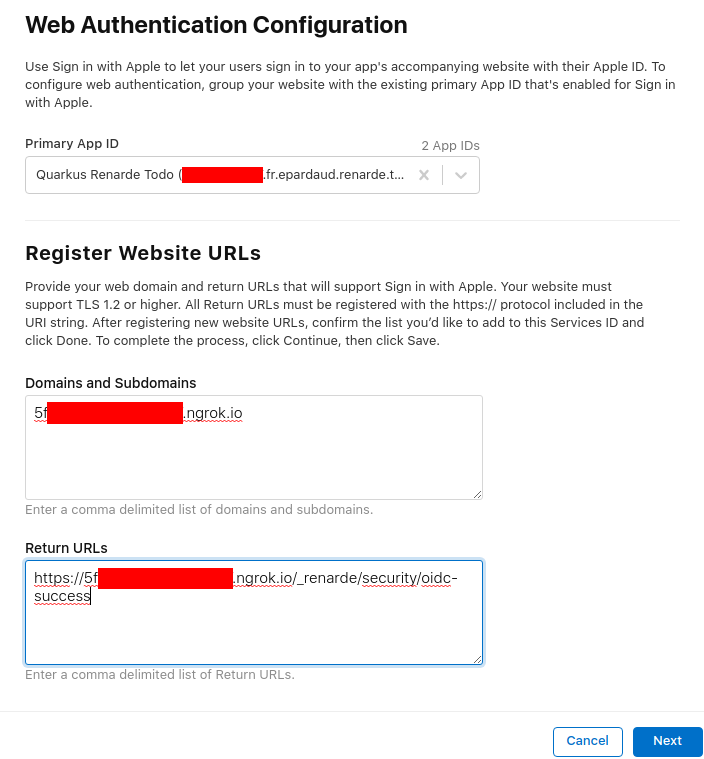
Now press Done:
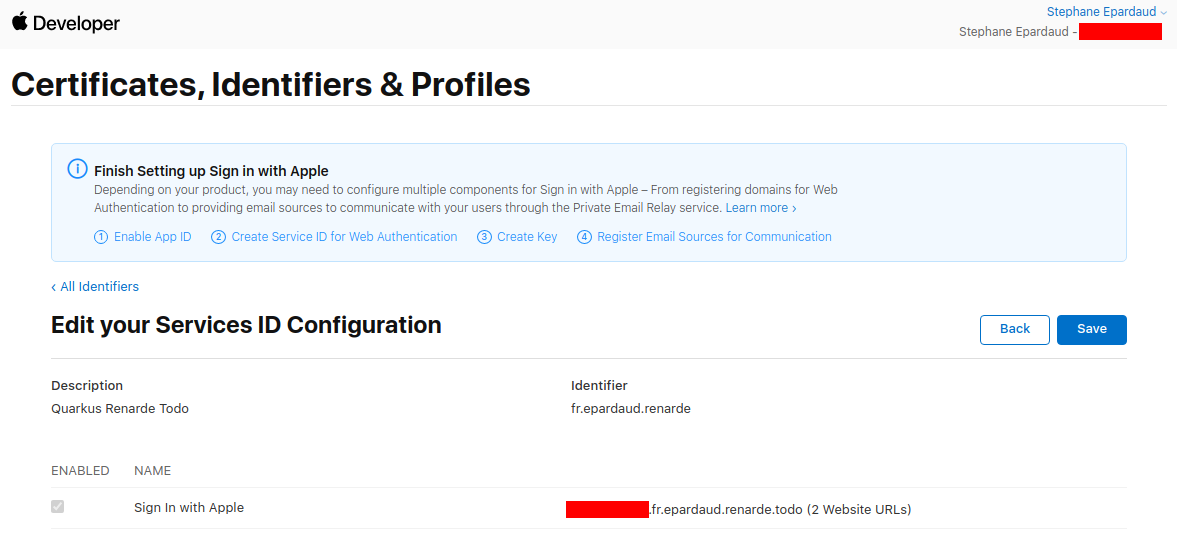
Now press Continue:
And now press Save:
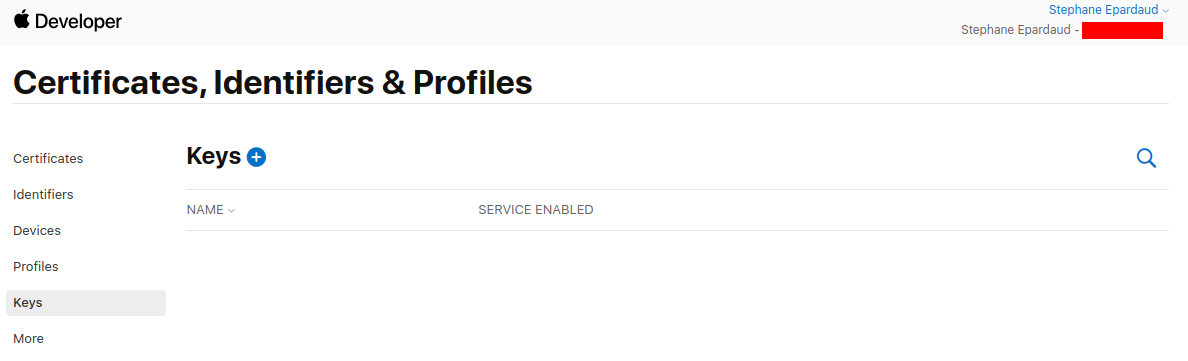
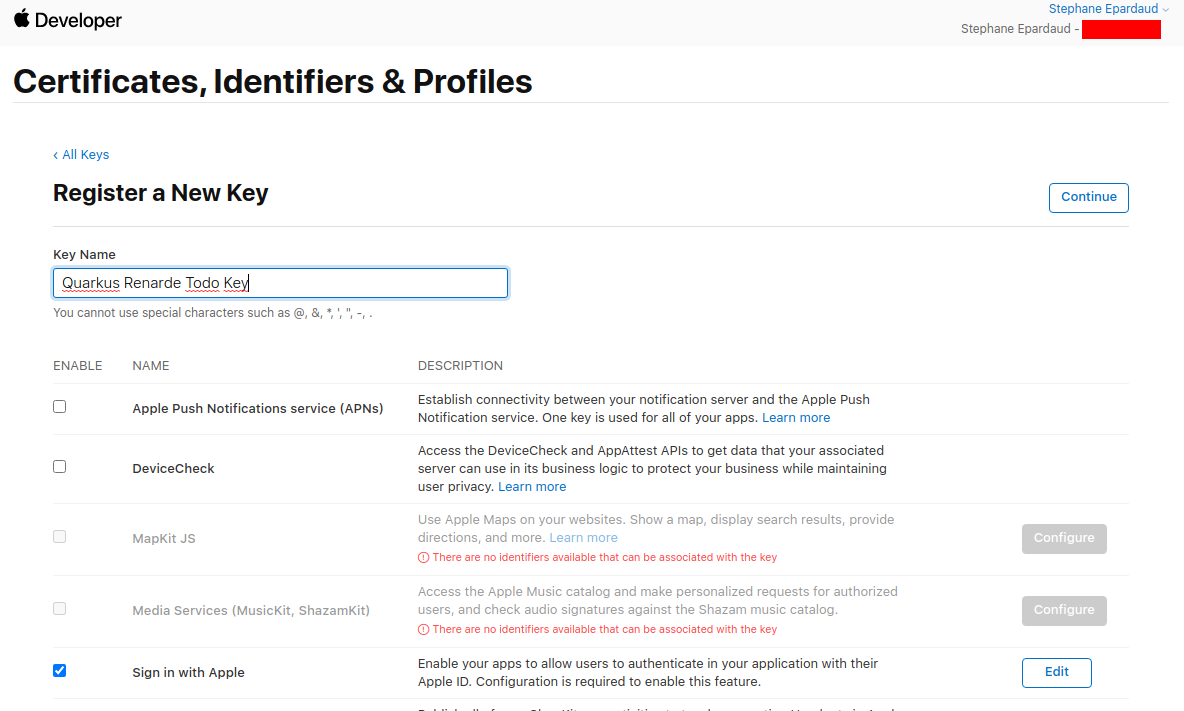
Go to the Keys page on the left menu, and press +:
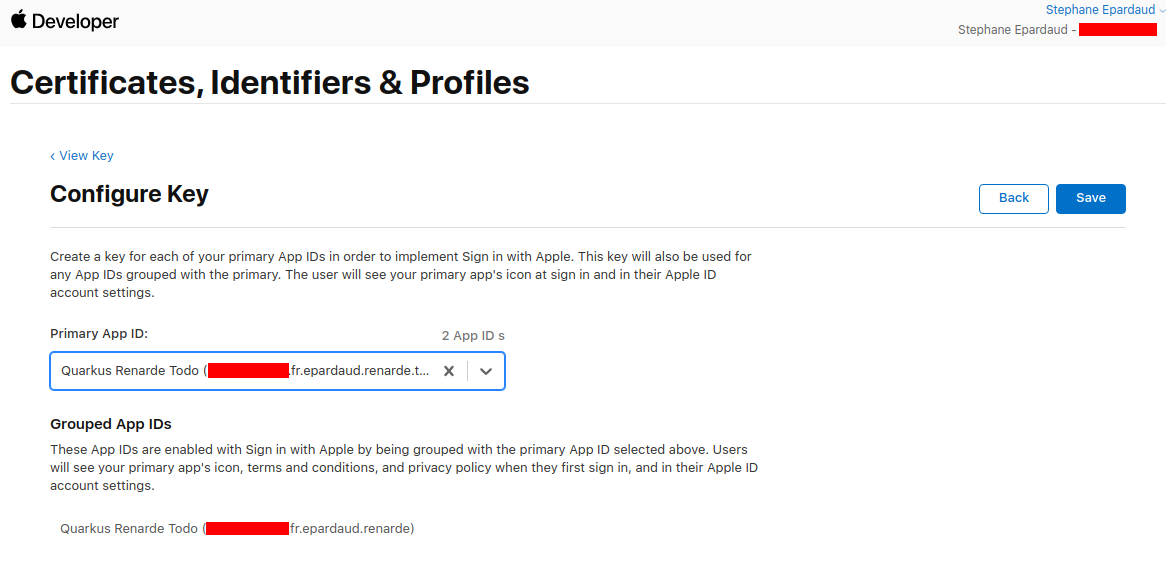
Fill in a key name, enable Sign in with Apple, and press Configure:

Select your Primary App ID and press Save:
Back on the key page, press Continue:
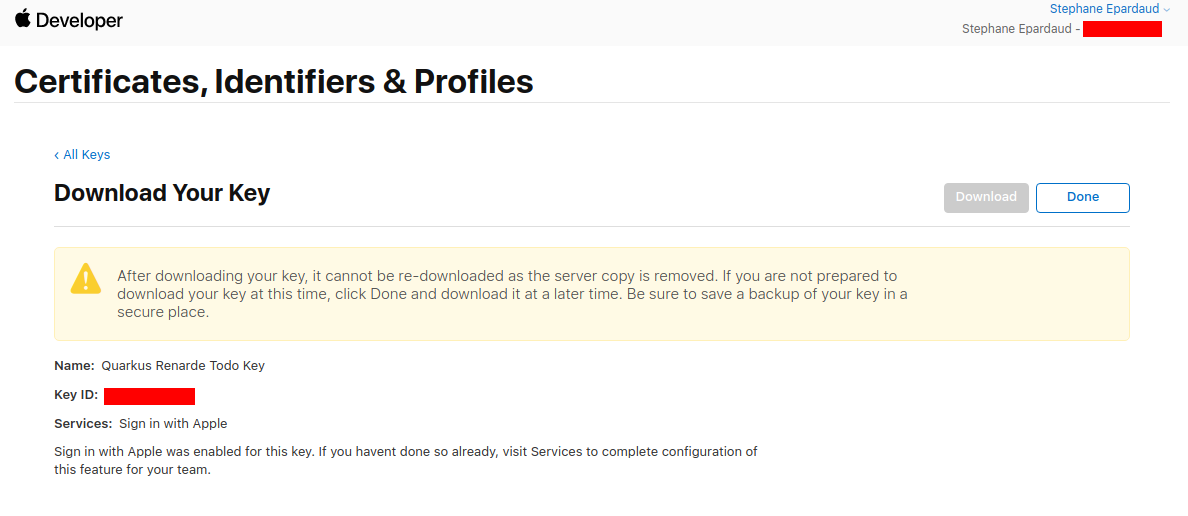
Now press Register:

Write down your Key ID, download your key and save it to your Quarkus application in src/main/resources/AuthKey_<KEYID>.p8:
You can now configure your your application.properties:
quarkus.oidc.apple.provider=apple
quarkus.oidc.apple.client-id=<Bundle ID>
quarkus.oidc.apple.credentials.jwt.key-file=AuthKey_<Key ID>.p8
quarkus.oidc.apple.credentials.jwt.token-key-id=<Key ID>
quarkus.oidc.apple.credentials.jwt.issuer=<App ID Prefix>
quarkus.oidc.apple.credentials.jwt.subject=<Bundle ID}
Setting up OIDC for Facebook
Facebook you will not be let you test your application on localhost like most other OIDC providers:
you will need to run it over https and make it publicly accessible, so for development purposes
you may want to use a service such as https://ngrok.com.
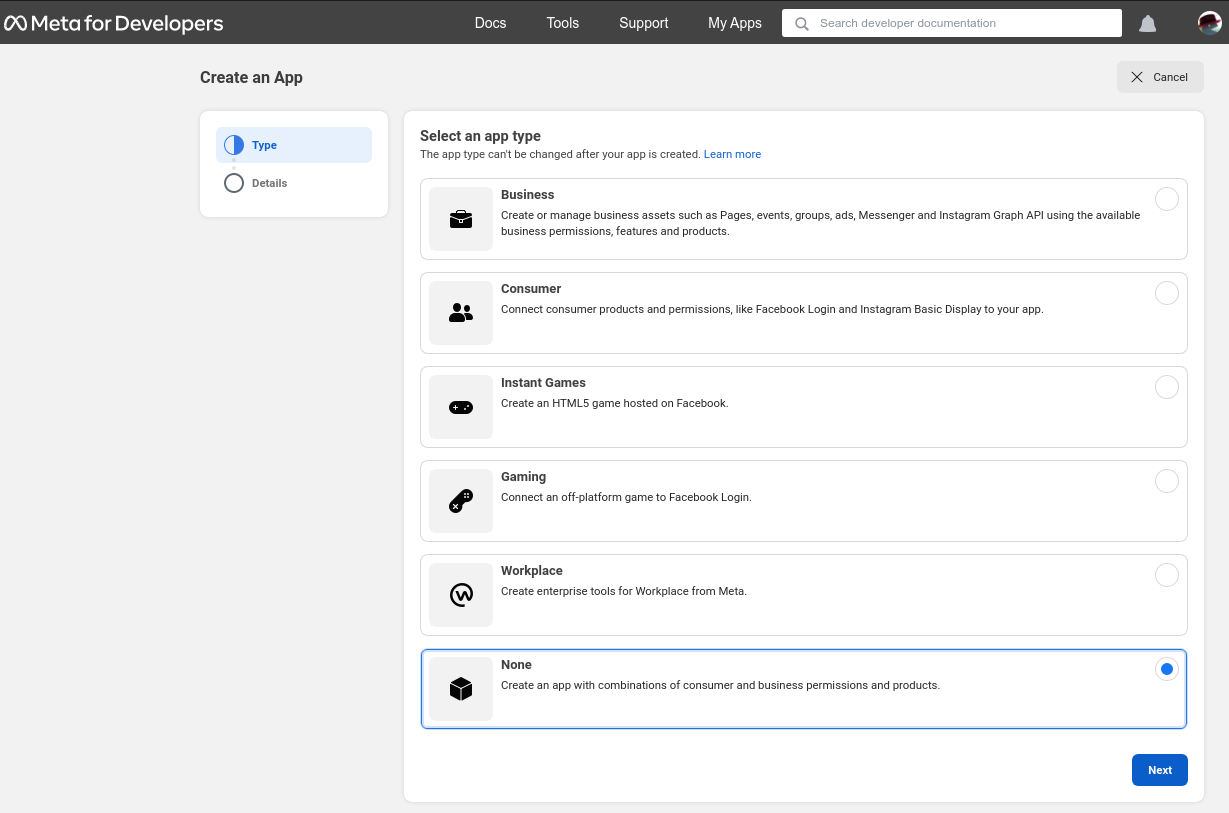
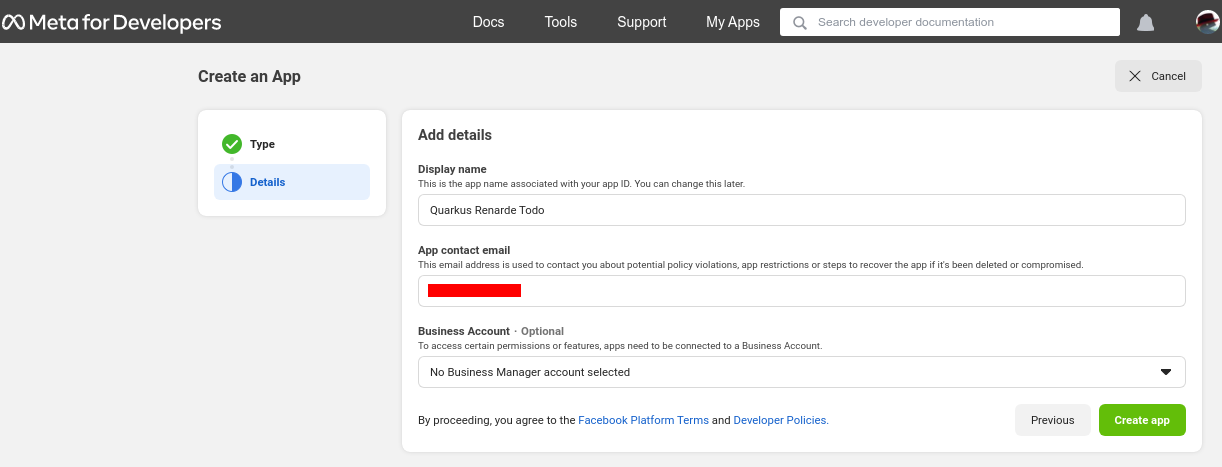
In order to set up OIDC for Facebook start by Creating an application, select None as an app type, and press Next:
Now enter an application name, and contact email, and press Create app:
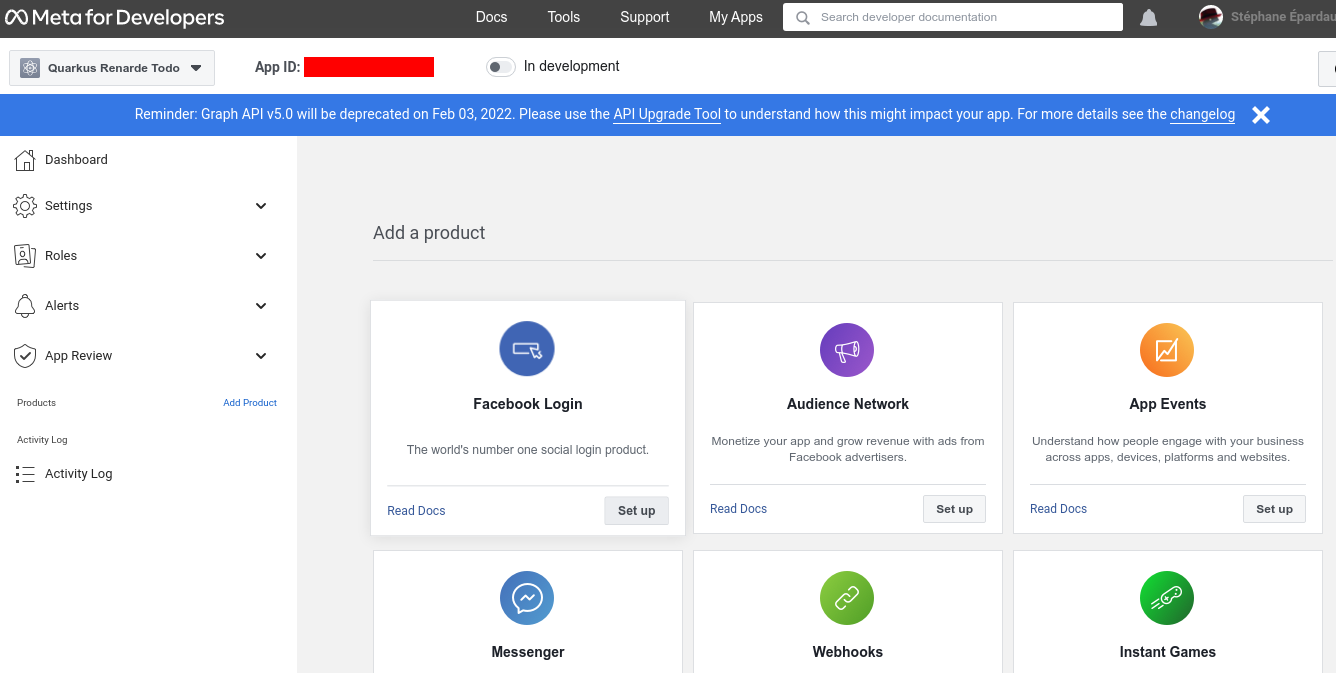
On the app page, click Set up on the Facebook login product:
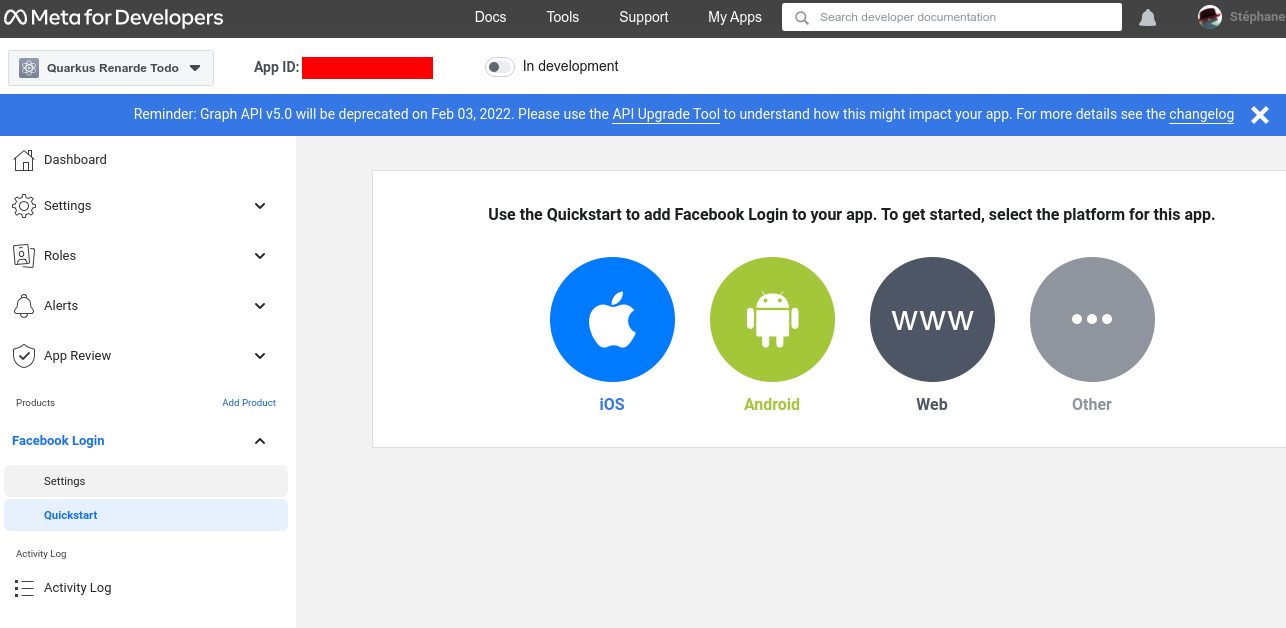
Quick the Quickstarts page and click on Facebook login > Settings on the left menu:
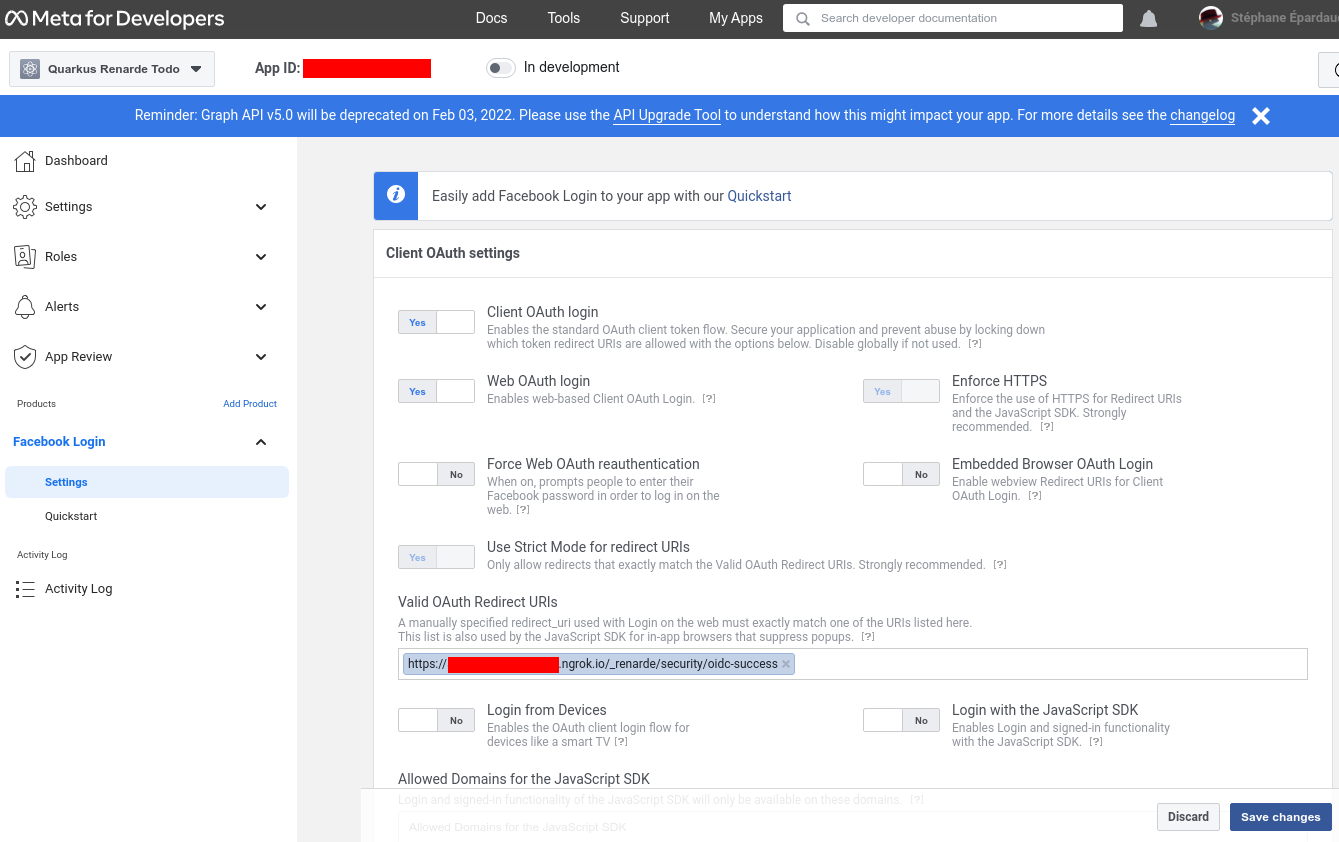
Enter your Redirect URIs (set to <host>/_renarde/security/oidc-success) and press Save changes:
Now go to Settings > Basic on the left hand menu, and write down your App ID and App secret:
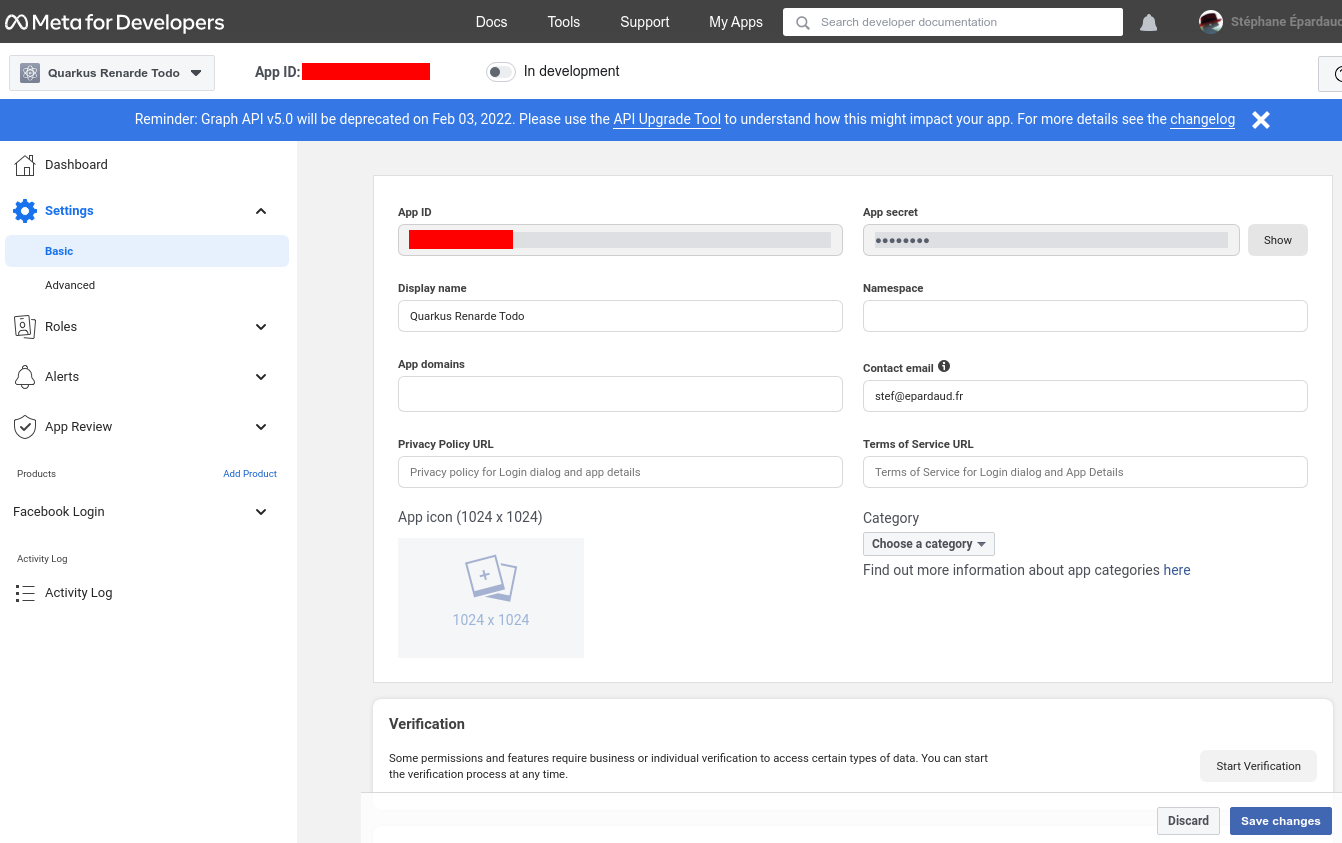
You can now configure your your application.properties:
quarkus.oidc.facebook.provider=facebook
quarkus.oidc.facebook.client-id=<App ID>
quarkus.oidc.facebook.credentials.secret=<App secret>
Setting up OIDC for Twitter
You can use Twitter for OIDC login, but at the moment, it restricts access to the user’s email, which means you will have to obtain it and verify it yourself.
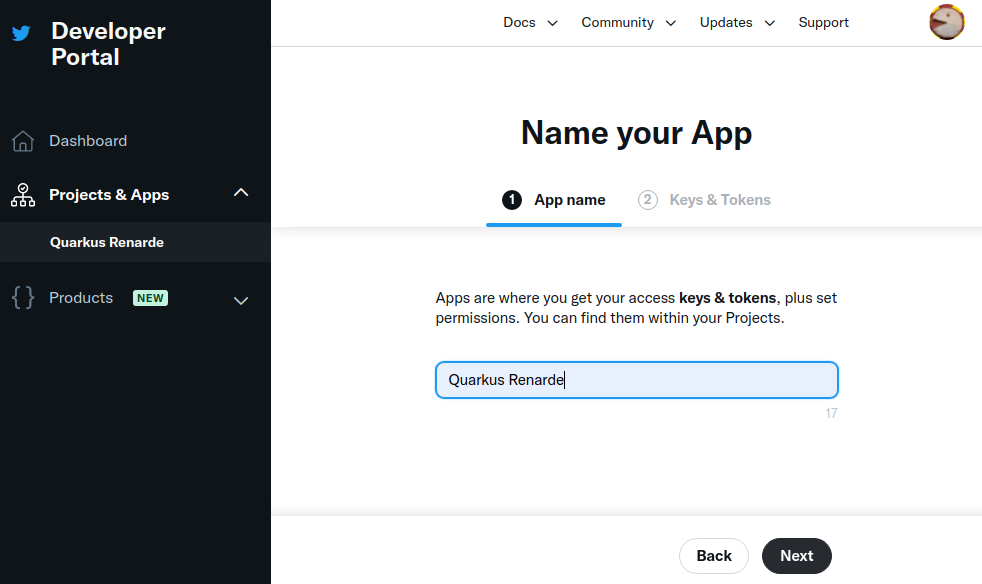
In order to set up OIDC for Twitter start by Creating a project, enter a project name, and press Next:
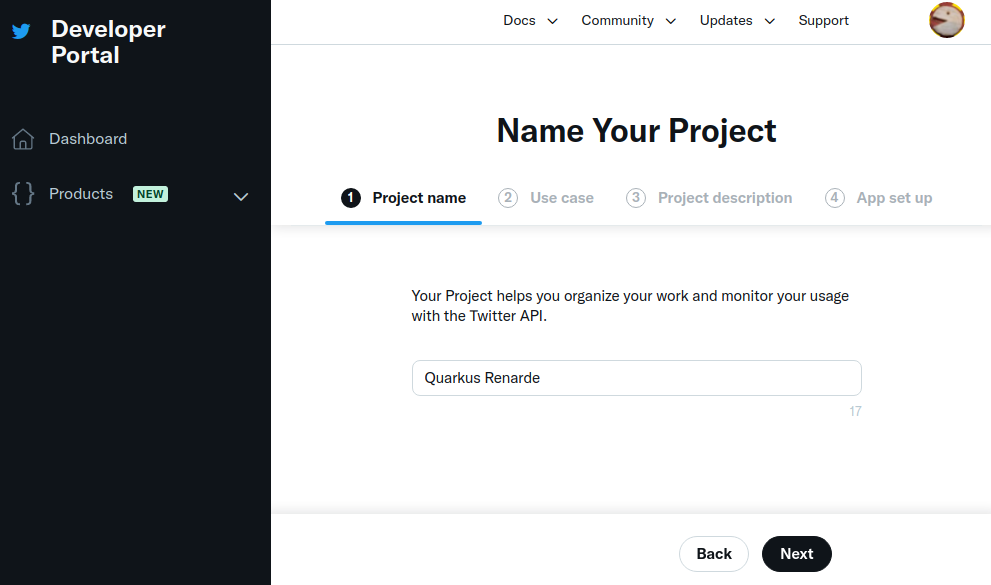
Enter a use case, and press Next:
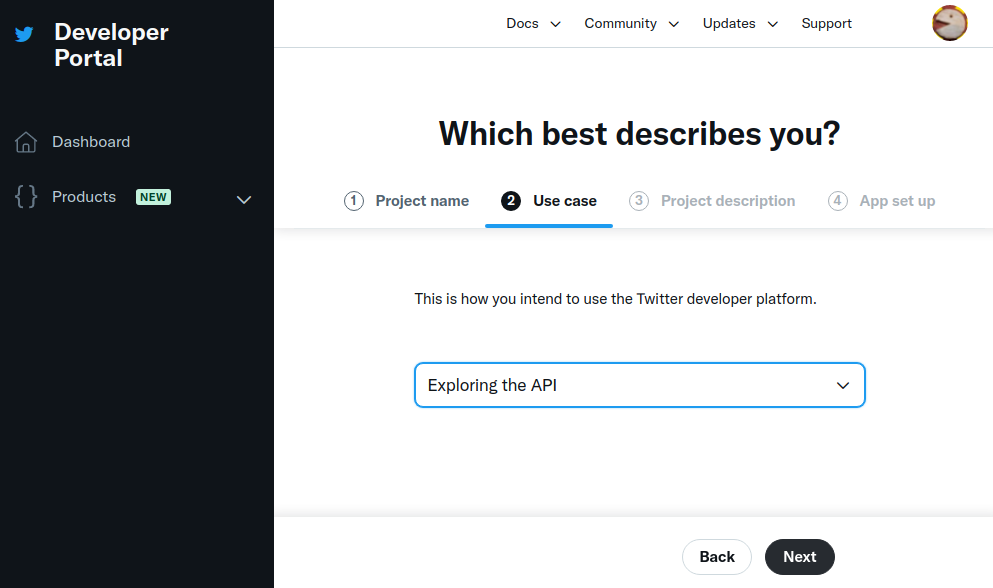
Enter a project description, and press Next:
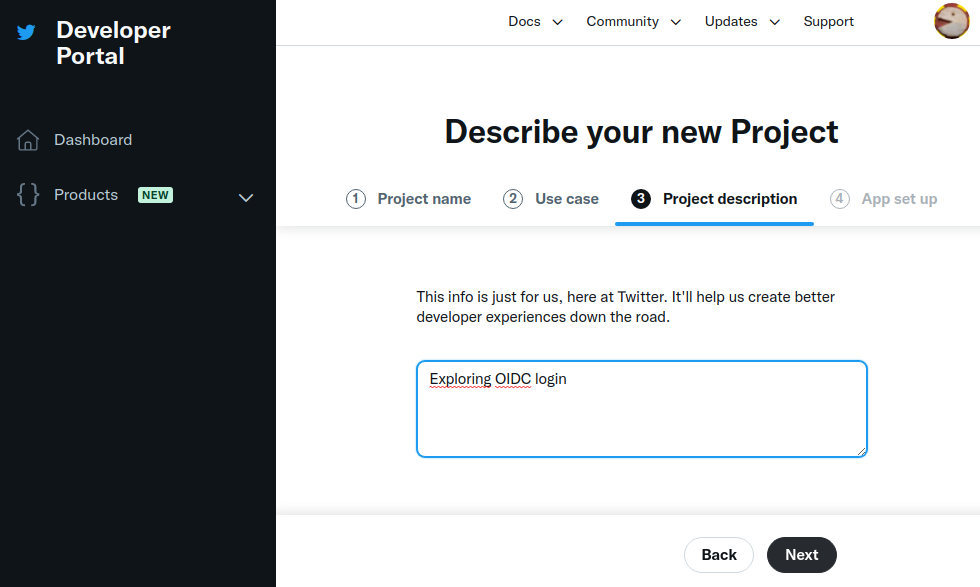
Now enter an application name, and press Next:
Write down your keys, because they will not be displayed again, and press App Settings:
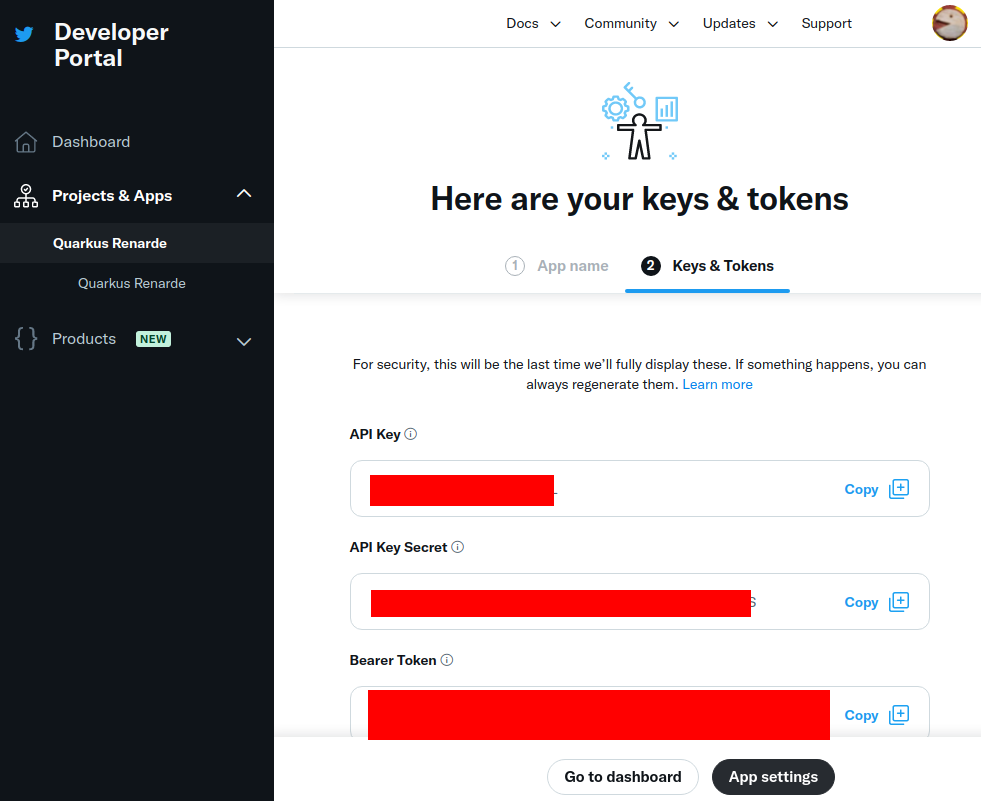
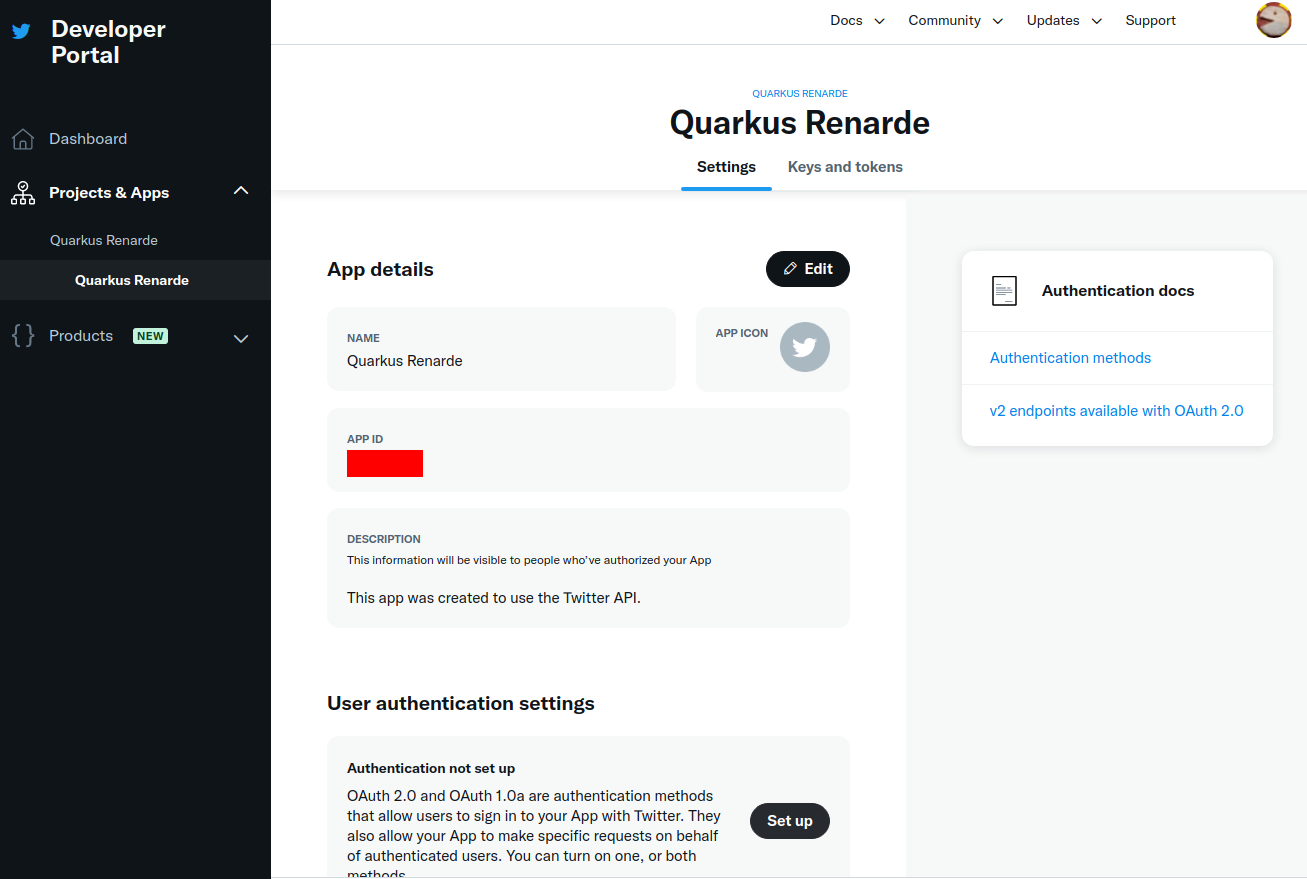
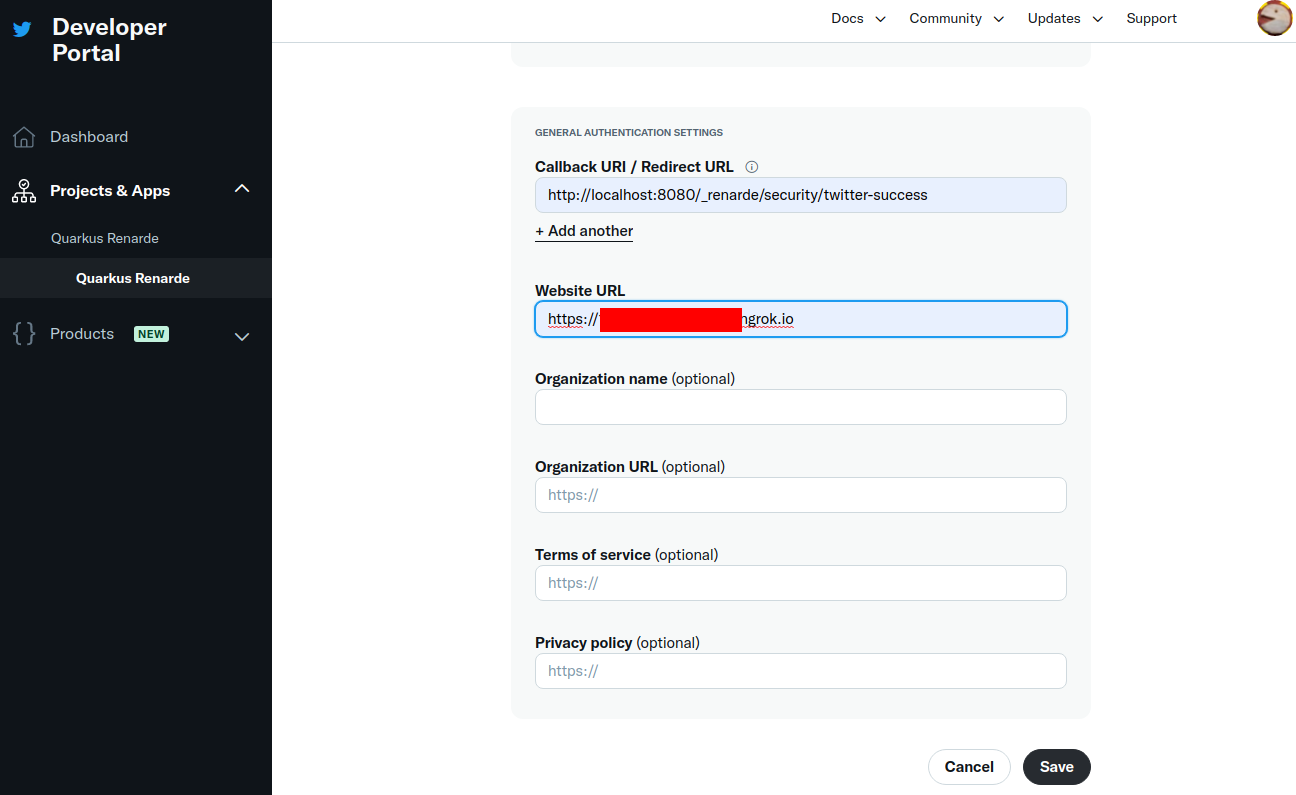
Navigate down to the User authentication settings section and press Set up:
Check the OAuth 2.0 check box:
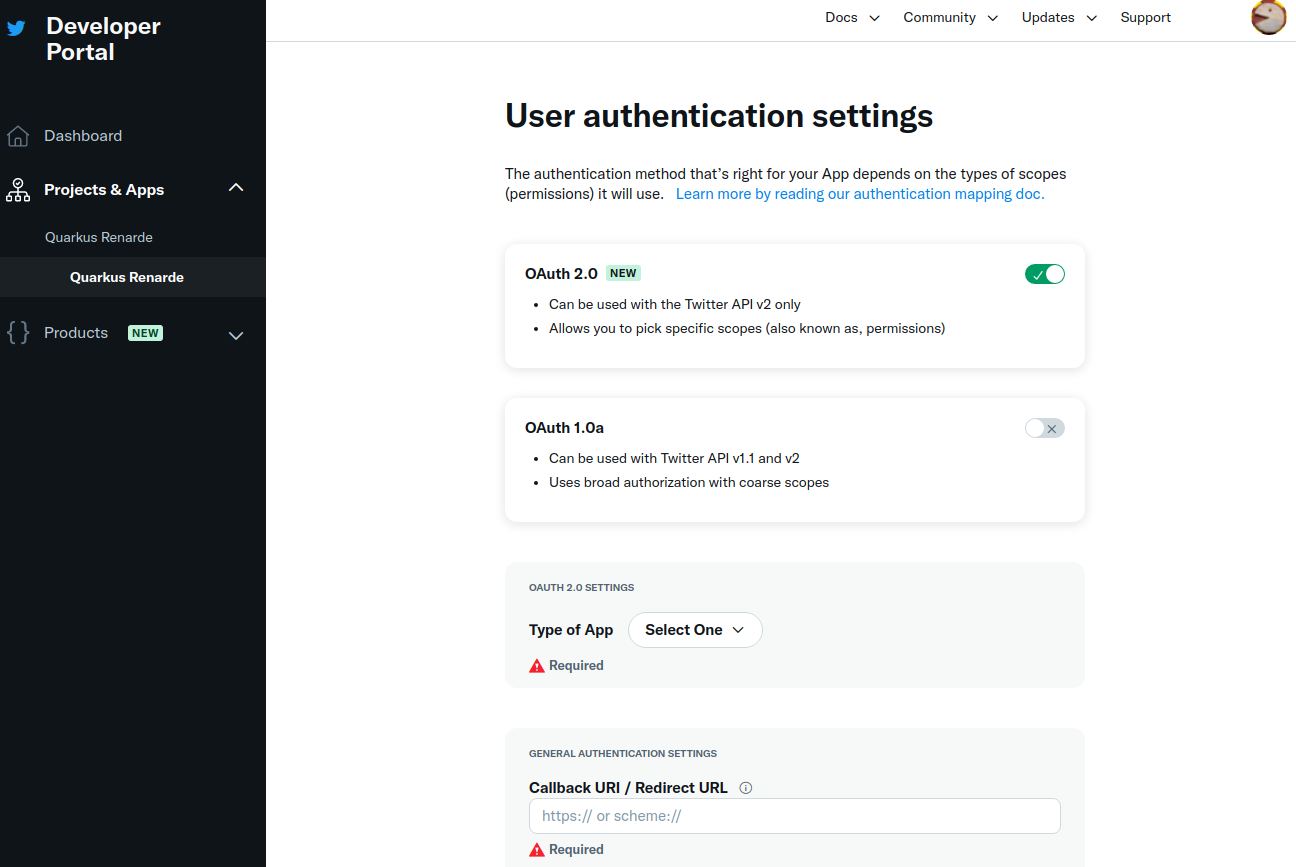
Select Web App as application type, then fill in your application details (use <host>/_renarde/security/twitter-success
for the Callback URI).
Twitter doesn’t require https usage in practice, but won’t accept your Website URL without it, so
you can still use ngrok for it.
|
Now press Save:
You can now copy your Client ID and Client Secret and press Done:
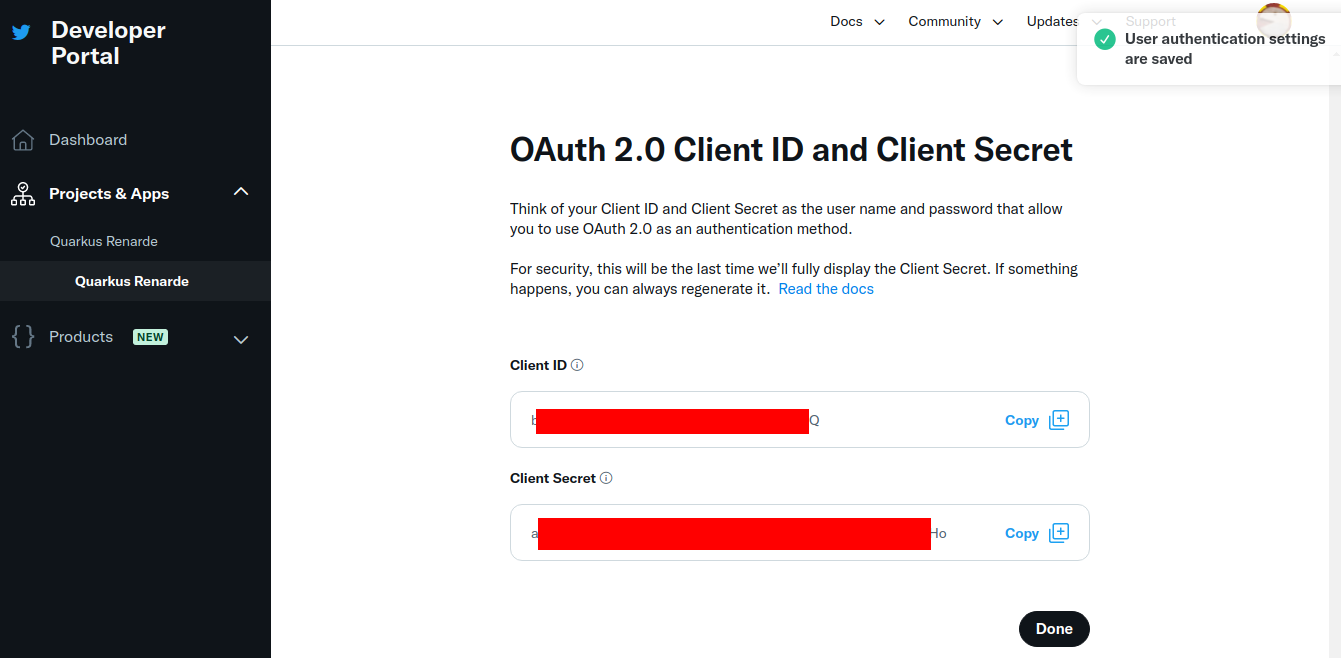
You can now configure your your application.properties:
quarkus.oidc.twitter.provider=twitter
quarkus.oidc.twitter.client-id=<Client ID>
quarkus.oidc.twitter.credentials.secret=<Client Secret>